Collapse
CollapsingX
  • - or -

Deploying and running your project


When you deploy a project, the executable version of that project is copied to your runtime platform. Once deployed, the project is run autonomously on your platform. You can still use Matrox Design Assistant to interact with the project in a limited fashion, but you can also safely close Matrox Design Assistant. You can run and manage any project that has already been deployed to a platform from the Matrox Design Assistant configuration portal. For information on platforms, see the Connecting to a runtime platform section earlier in this chapter.

Deploy to platform

To deploy your project, perform the following:

  1. Select the Platform Deploy project menu item or click on the Deploy project () toolbar button in the Platform toolbar. The Deploy Project dialog appears.

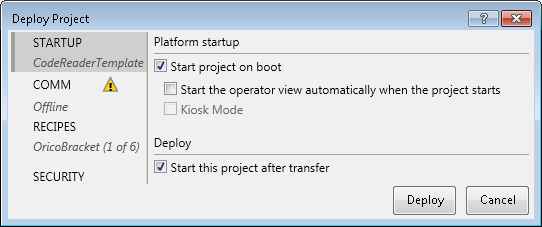
  2. Optionally, so that the project runs immediately once it is deployed, leave the Start this project after transfer option enabled.

  3. Optionally, set the project to start automatically every time your platform is initialized (powered up or rebooted). This setting can be changed later in the STARTUP tab of the PROJECTS portal page of the Matrox Design Assistant configuration portal. You can enable this setting for multiple projects, if you want to start and run them all simultaneously on the runtime platform (provided your runtime platform has sufficient resources). For more information, see the Considerations when running multiple projects simultaneously section in Chapter 60: Running multiple projects on a runtime platform.

  4. Optionally, if the project is set to start automatically every time the platform is initialized, and if you have a display screen directly connected to your runtime platform, you can enable the Start the operator view automatically when the project starts option.

    On a PC platform, if the computer is not configured to automatically login before the project starts, the user will be prompted to enter a user name and password. Use a third-party program to allow automatic logon (for example, Autologon, which you can find at http://technet.microsoft.com).

  5. Optionally, if the operator view is set to open automatically, you can choose to have it open in Kiosk mode.

  6. Optionally, you can lock the project. For information, see the Encrypting and locking a project section in Chapter 61: Security.

  7. Click on the Deploy button. The project will be deployed. Note that deployment might take some time. Even when the project starts running, there might be up to a minute delay before the operator view web page is updated and available.

If industrial communication protocols are enabled (for example, PROFINET), and one or more communication protocols are offline, you will get a warning. For more information, see the Going offline subsection of the Communications dropdown panel section in Chapter 39: Communication overview.

If deployment is successful, and you have selected to run the project immediately, your project's operator view web page will open in your web browser and a message about the successful start of your project will appear in the Execution Messages pane.

Files downloaded during deployment

During deployment, the project is saved and the flowchart files, static images, custom steps, and any MIL context files are downloaded to the platform for all recipes that have been selected for deployment. The operator view files are merged with template files containing the necessary scripts to let the operator view exchange information with the runtime project executable, and the resulting html file is sent to the platform. For more information about the operator view files, see Chapter 50: Customizing the operator view.

Recipes and persistent data

During deployment you must select which recipes will be downloaded to your runtime platform. The first time you deploy your project to a runtime platform, all recipes will be deployed by default. If you re-deploy your project to the same runtime platform, only the current recipe will be deployed by default. In either case, you can change which recipes will be deployed from the Deploy Project dialog. For more information about recipes, see the Recipes overview section in Chapter 55: Recipes.

All steps which change per-recipe are persistent, as are many other elements of your project. When you re-deploy your project, all persistent elements on the runtime platform will have their values replaced by the values you have set on your development computer. If you need to retain the persistent data that is currently on your runtime platform, such as changes to a recipe made from the operator view, use the synchronization buttons in the Recipes pane. For more information about persistence, see the Persistence and the SavePersistentData step section in Chapter 57: Persistence.

Starting a project from outside Matrox Design Assistant

After deploying projects to a platform, you can run and manage those projects from the Matrox Design Assistant configuration portal of the runtime platform. Anyone with access to the platform's portal pages can run a project.

  1. Open the portal by typing the name or IP address of the runtime platform into the address bar of your web browser. Format the name as an address, that is, http://name.

  2. You will be brought to the HOME portal page. Every project deployed on your platform is listed. If you have set a project to automatically start upon platform initialization, you will see it noted as a "Startup Project".

  3. Click on the Start button next to the project you want to run.

  4. Optionally, click on the presented Open Operator View button. The operator view will be displayed in your web browser.

For other information about portal pages, see Using the Matrox Design Assistant configuration portal web pages.

In addition to setting the startup project options when deploying the project, you can also change them at anytime from the STARTUP tab of the PROJECTS portal page.

Kiosk mode

In kiosk mode, the operator view window is opened full screen while other GUI elements of the operating system and web browser are hidden from view (for example, the controls for closing and minimizing the window). Kiosk mode is typically used to prevent users from inadvertently closing the operator view or changing operating system settings.

Note that some operating system keyboard commands are still accessible in kiosk mode. Some keyboard commands can allow the user to exit kiosk mode. Kiosk mode should therefore not be considered a security feature.

To limit the access that the operator has to a platform, a typical configuration is to set a startup project and display its operator view in Kiosk mode on the browser of the target platform. The operator will only be able to see the operator view of the project. A platform can have multiple startup projects, but only one can be running in kiosk mode. As such, this setup works well when a platform will only run one project.

You must open the portal page for your PC platform or smart camera using a remote computer if you want to be able to access the operator views of other projects, or otherwise control the platform beyond starting or stopping projects remotely.

To leave kiosk mode, you must open a web browser on a remote computer and access the STARTUP tab on the PROJECTS portal page. Deselect the Kiosk Mode option for the project. You must reboot the runtime platform for this change to take effect. Alternatively, you can stop your project and then re-deploy it with kiosk mode deselected.

Preventing runtime errors

When running a project, errors can occur. When creating your project, you should try to avoid errors and deal with errors when they happen. The Status step and Error step are used to handle runtime errors without causing a project to terminate. By default, all new projects start with a Status step, which typically should not be removed from the end of the flowchart. For more information on the Status step, see the Procedure for using the Status step and Error step section in Chapter 23: Flow control steps.