Procedure for using the Status step and Error step
 Previous
- Next

The Status step has several functions. It evaluates pass and fail conditions, catches exceptions or errors, generates labels for the operator view filmstrip element, and collects statistics on the conditions that occur in Analysis and Processing steps.
It is highly recommended to keep the original Status step as is, at the bottom of the flowchart and with its original name. The operator view filmstrip element uses the inspection labels "Pass" and "Fail", which are only evaluated by a Status step with the name "Status". You can add more Status steps, which is useful for projects with multiple states or conditional branches.
The Error step throws exceptions to the next Status step, or terminates the runtime if there is no following Status step.
The Status step has limitations when it is part of a recipe. See the Recipes overview section in Chapter 55: Recipes for information.
 Conditions
and the Status step
Conditions
and the Status step
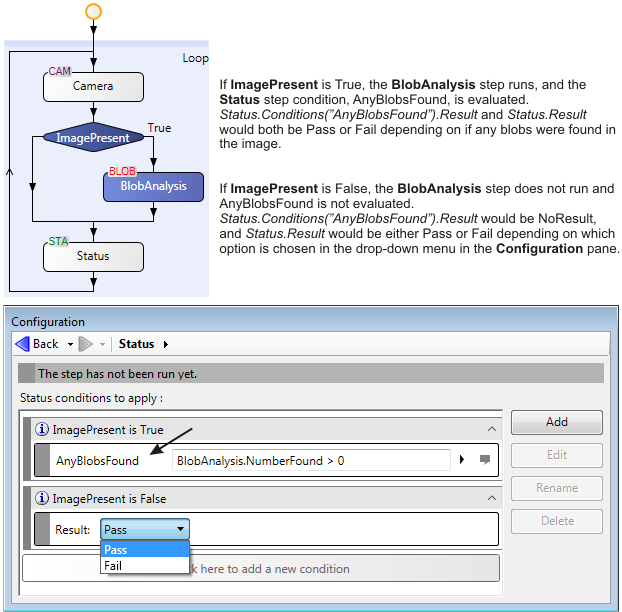
A Status step has a Result output that is either Pass, Fail, or NoResult, depending on user-defined conditions. By default, a Status step has no conditions and its Result output is always Pass. As such, the conditions are expressions that are usually based on outputs of other steps, such as BlobAnalysis.NumberFound < 5. Conditions are typically added directly from the Configuration pane of Analysis and Processing steps, but can also be added using the Configuration pane of the Status step.
You can monitor the status of individual conditions in a Status step with Status.Conditions("ConditionName").Result. When a condition has not yet been evaluated as true or false, the status is NoResult. This typically occurs when there is a branch in the flowchart and the condition is based on the branch not taken.
The Status step maintains a count of the number of iterations that passed and failed. These counts can be seen in the default operator view and are persistent, by default. Note that you can clear the count using the Reset Counter button in the operator view or by including the ResetCounters step in your flowchart. The pass and fail result and counts, along with many other results and conditions of the Status step, are used for the PassFail and Filmstrip operator view elements, publishing, the Camera Images pane, and in creating inspection labels.
There are 2 ways to create a new condition in a Status step, by adding the condition via an Analysis and Processing step, or by adding a condition via the Status step. Either way, a condition can be edited using the Status step and each new condition automatically creates a new inspection label.
To create a new condition in a Analysis and Processing step:
-
Select a step earlier in the flowchart than a Status step.
-
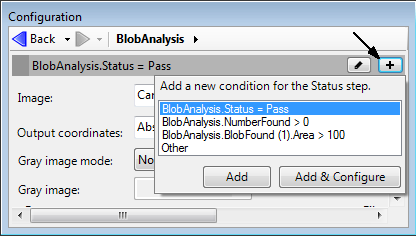
Click on the Plus button in the gray bar at the top of the Configuration pane.
-
Choose from among the suggested conditions in the list and click the Add button or the Add & Configure button. Clicking the Add button creates a new condition in the next Status step in the flowchart and the Analysis and Processing step remains selected. Clicking the Add & Configure button creates a new condition in the next Status step in the flowchart and that Status step becomes selected, allowing you to configure the condition there. For more information on how to use the different editors, see the Configuration pane and editors section in the Panes and editors reference chapter.
-
Optionally, if a condition is already linked to the step, you can click on the Pen button in the gray bar at the top of the Configuration pane to edit that condition.
To create a new condition in a Status step:
-
Select a Status step in the flowchart.
-
Click on the Add button in the Configuration pane.
-
Enter an expression using the Simple, Link, or Advanced editor of the Configuration pane.
-
Optionally, click on the Edit button or Rename button to change either the expression or the name, respectively.
In addition, the Status step has 2 properties which only appear in the Properties pane: the ConditionEvaluation property and the Suspend property.
The ConditionEvaluation property determines whether the Status step evaluates all its conditions, or just evaluate conditions until the first one fails. The latter option saves time but will not report on several failed conditions.
The Suspended property determines if the Status step should be ignored. If set to True, Status.Result, and the results of all the conditions in the step, will be NoResult. This is primarily used to turn off statistics collection while the flowchart is in a training or configuring state.
Catching
and throwing exceptions
Certain situations can occur that cause a step to create an error, such as a fixture that depends on a match result that wasn't found. Rather than closing the project, the flowchart control automatically jumps from the step that created the error to the next Status step, continuing from there. These errors are called exceptions, and the process of jumping from the step that caused the error to the Status step is called throwing and catching an exception.
If a Status step has caught an exception, there are several output properties that provide information about the exception. These properties can be found in the tree structure and include the following:
-
Status.ErrorCaught. A boolean which states whether an exception was caught in the last iteration.
-
Status.ErrorCount. A numeric which tallies the total number of exceptions caught since starting the flowchart.
-
Status.ErrorMessage. A string array of either the names of all the conditions that have failed, or the error message created by the step that is throwing the exception, if an exception is thrown.
Error step
Catching
exceptions in flowcharts with conditions and loops
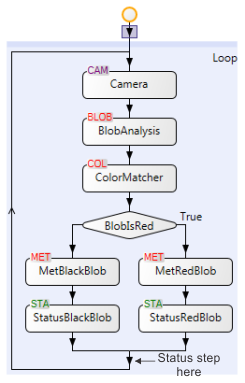
There is one more nuance to which Status step catches an error. When an error occurs in a step, an exception is thrown to the next Status step, at the same or higher (outer) level of nesting. For example, look at the following flowchart. The BlobAnalysis step finds a blob, the ColorMatcher step determines if the blob is red or black, the Condition step points the flowchart down the appropriate branch, and each branch has its own Metrology step and Status step. If an error occurred in either of the Metrology steps, the following Status step would catch the error and the flowchart would continue on. However, if the BlobAnalysis step fails to find any blob, then the ColorMatcher step, which uses the found blob in its own expressions, will throw an error. This error will not be caught by any Status step because the only 2 Status steps in the flowchart are at a deeper (inner) level of nesting, within the conditional branch. This ColorMatcher step error could cause the program to terminate.
The simplest solution is to keep a Status step at the absolute bottom of the flowchart, where it is by default when you create a new project. This Status step could catch any error in the flowchart because it is at the highest level of nesting. You might want to add steps past the bottom Status step, for example, to write and save inspection data. If those steps generate errors, your project will terminate if you did not add a new Status step at the bottom of the flowchart.
Multiple Status
steps
Complex projects might use multiple Status steps to gather results from a section of the flowchart. If the project has multiple states and performs a handshake with a controller after each state, there should be a Status step for each state. If not, an error condition that jumps to the next Status step would skip the handshake.
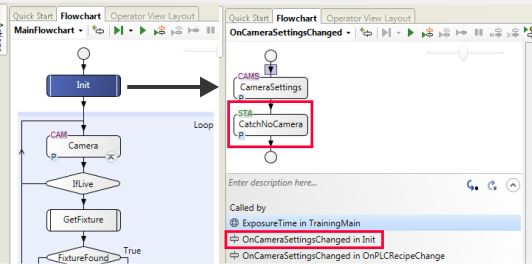
In the following image, an initialization is performed before entering the main flowchart's loop. If an error occurred in that initialization and no Status step was included in it, the project might terminate since the next Status step is nested in the loop. Adding Status steps in the initialization ensures that all errors are caught.
Note that when using multiple Status steps, it is important to keep the original Status step, with its original name, at the bottom of the flowchart.