The operator view Filmstrip element lets you review past runtime
inspection results, which are stored in a trend buffer. Each
inspection result contains history elements, inspection labels, and
thumbnails.
You can specify the maximum number of inspection results that
will be stored, the maximum number of results stored with a copy of
the display image, under which conditions the inspection result is
stored, and which output elements from the operator view are
stored.
MaxTrend
specifies how many inspection results can be stored in total. By
default this is 300. MaxTrendWithImage specifies
how many inspection results that include a Display element can be
stored. By default, MaxTrendWithImage is set to
Auto, which automatically determines a maximum number of stored
inspection results with Display elements based on the hardware of
the runtime platform. However, you can set the number explicitly;
it should be between 2 and 100, and at least twice the number of
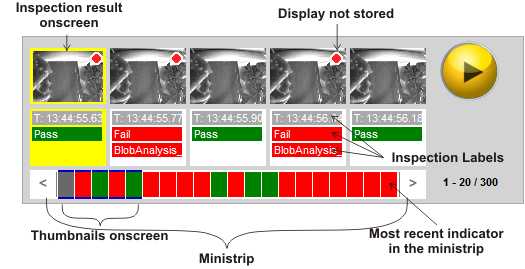
displayed thumbnails. An inspection result that is saved without
the Display element appears in the Filmstrip as a thumbnail with a
red dot in the corner.
Inspection result storage for inspection label and result data
is a fixed length trend buffer, and when it is full, the oldest
item is discarded and the new one is added. Storage for the
associated images is also a fixed length trend buffer.
History elements are the output elements that are saved with
each inspection result. You can set whether each output element
will be stored as a history element. By default, the Display
element, the PassFail element, the Analysis time and Frame rate
value elements are set to be stored as history elements. All newly
added elements are not set to be stored as history elements, by
default. You must manually set each one to be stored.
When a past inspection result is being viewed, the history
elements display the data of the output element at the moment the
inspection result was saved.
The easiest way to understand how the following properties work
is to explore the Getting started example, found in the examples
folder of the
Quick Start tab. In this example, you can see how to set up
recording and viewing controls.
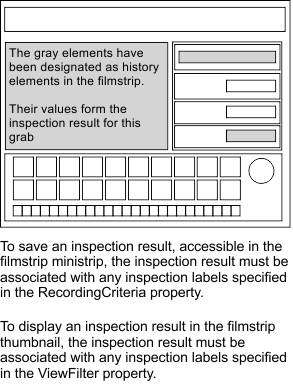
By default, every inspection result is recorded (given the limit
of how much memory was designed for a filmstrip) and every result
is viewed as a thumbnail in the filmstrip. To be selective about
which inspection results are saved and/or displayed, you can
specify inspection labels that signify to save and/or display the
inspection result. An inspection result will only be saved and/or
displayed if at least one of the specified inspection labels
applies to the current image on display. For more information on
inspection labels, see the
Inspection labels section in
Chapter 2: Building a project.
The following image summarizes the properties that control when
inspections results are saved and/or displayed.
Note that all the properties used to control what gets saved or
displayed are only found in the
Properties pane of the Filmstrip element.

 How to specify when
inspection results are saved
How to specify when
inspection results are saved
To specify when inspection results are recorded or to turn off
all recording, set the RecordingMode property to
BasedOnCriteria or NoRecording, respectively. If you select
BasedOnCriteria, the RecordingCriteria property
becomes available. Use this property to specify an array of one or
more inspection labels. When any of these inspection labels are
applied to an inspection result, that result is recorded.
Note that including a Filmstrip element will consume system
resources, especially if it is constantly recording. Recording
everything quickly fills the storage space allocated for the
filmstrip, and also slows down the project, especially on platforms
with slower processors or limited memory. You could configure a
Filmstrip element that only records in certain circumstances, such
as when an operator view button is pressed or when the flowchart
enters a recording state, by dynamically controlling the
RecordingMode
property.
How to specify
when inspection results are displayed
To specify when inspection results are viewed as a thumbnail in
the filmstrip, set the EnableViewFilter property to
True. Once this is selected, the ViewFilter property will be
available. Use this property to specify an array of one or more
inspection labels. When any of these inspection labels are applied
to an inspection result, that result will appear in the
filmstrip.
Note that the filmstrip thumbnails can only display images from
a single camera, specified in the CameraStep property in the
filmstrip
Properties pane.
When
inspection labels are applied to an inspection result
Timing for filmstrip display and storage depends on the operator
view publishing synchronization. At the first update point that
displays the
Camera step's image (specified in the CameraStep property), all
the associated inspection labels are evaluated. If the condition of
any inspection label in the RecordingCriteria property
is evaluated as True, then all the selected operator view elements
(set with the History Elements property)
will be stored as a single inspection result. In a typical project,
operator view data is published at the bottom of the main loop.
More complex projects with nested loops or multiple modes might
have additional publishing points for the publishing groups
containing image Display elements. This might evaluate the
Pass/Fail condition before it has all its results. See the
Controlling when data is sent to the
operator view section later in this chapter more information
about publishing points.
Examples of specifying
inspection labels
There are 3 main examples of how to be selective with recording
or viewing inspection results: a single inspection label, multiple
inspection labels, and a variable containing inspection labels
chosen from a list.
Note that the predefined inspection labels Pass and Fail are
specifically tied to a
Status step named Status. You should not change the name of
the original
Status step, or at least rename another
Status step, Status.
To record or view only those inspection results based on a
single inspection label, such as Fail or Too_many_blobs_Fail, just
enter the name of the inspection label in the appropriate field in
the Property pane.
To record or view only those inspections results with at least
one active inspection label of a list of several inspection labels,
just enter an array of strings, as shown below. Note the
evaluate-to-string operator ({}),
followed by the array operator ([])
followed by the inspection labels in quotes. Each label is
separated by a comma.
To record or view only those inspection results with an active
inspection label, where the inspection labels have been chosen by
the user and are stored in a variable, enter the variable name as
shown below.
To enable a user to choose which labels to record or view, you
could set up a type of
list element with a list of inspection labels, then bind the
element to a string array variable. This string array variable is
entered in the Properties pane, as described above. The Getting
started example demonstrates this.
Freeze Mode
The FreezeMode property is set
to either All or Viewed. When set to All, nothing more is recorded
when the filmstrip is paused, even though the project continues to
run. The new data created during the pause is lost. When set to
Viewed, the inspection results that are currently viewed in the
thumbnails are kept, but all other past inspection results are
overwritten with new data. It is possible to keep some of the past
data using the inspection label criteria, discussed below.
Label
Constraints
To help collect data associated with very infrequent
occurrences, it is possible to protect inspection results that have
a given inspection label from being discarded by using the
LabelConstraints
property. The LabelConstraints property
has a minimum number of occurrences for each inspection label. An
inspection result with a given inspection label will only be
discarded if there are at least the minimum number of inspection
results with that inspection label. By default, the Pass and Fail
inspection labels have a minimum occurrence of 10, so if an
inspection result with a Fail inspection label was about to be
discarded, but there were fewer than 10 inspection results with a
Fail inspection label, it would be saved and the next oldest
inspection result would be discarded.
Usually the number of slots in the Filmstrip element interface
is smaller than the MaxTrend and MaxTrendWithImage values.
Clicking on the arrows on the ends of the ministrip will move the
viewed section of results forward or backward by the number of
ministrip indicator slots.
A single click on any slot in the Filmstrip will switch the
operator view from displaying live data to displaying the saved
data for the selected slot. If a stored image is available for the
selected slot, it will be shown; otherwise a placeholder image is
shown.
It is important to note that while the display is frozen on a
saved inspection result, the flowchart is still running in the
background and continuing to inspect. The freeze only applies to
the operator view. To return to displaying live data, click on the
Play button.