Changes made to the values, images, and annotations are only
published to operator views at user-defined points called update
points. Annotations of Display elements are cleared at user-defined
points called clearing points. Cleared annotations will be removed
from the operator view the next time the Display element is
published.
Operator view elements are members of publishing groups, each of
which has its own update points and clearing points. By default,
each operator view has one publishing group that includes all of
its operator view elements. This default publishing group has a
single update point at Inspection End, and a single
clearing point at Inspection Start.
Your project might have more than one operator view. Each
operator view has its own operator view elements, publishing
groups, update points, and clearing points. For more information,
see the Multiple operator
views subsection of this section.
If a
Camera step times out and does not grab an image, the
update points for publishing groups with Display elements that link
to the
Camera step's Image or CorrectedImage output will
be skipped. You can ensure that other operator view elements (such
as Value elements) are still published in the case of a timeout by
putting them in a seperate publishing group from your Display
elements.
Update points occur at an event, and optionally only if a
condition is true (such as status.result=fail). There are 2 types of
update points:
-
StartEvent
and EndEvent
update points, which publish immediately before or after a
specified step, loop, or inspection has run.
-
A ChangedEvent update point,
which publishes immediately after a specified variable is written
to.
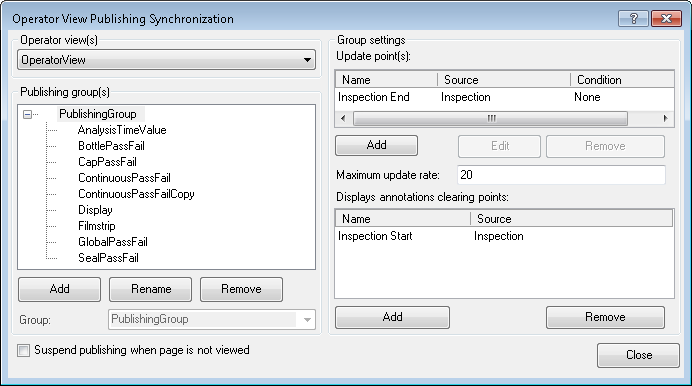
All configuration of publishing groups, update points, and
clearing points is done in the Operator View Publishing
Synchronization dialog, accessible from the Operator Views Synchronize
publishing... menu item.
You can specify the Maximum update rate for each
publishing group, which is the maximum number of times the
publishing group will be published each second. This value is used
to establish the minimum amount of time between updates. After the
publishing group is published, your project will skip update points
until an appropriate amount of time has elapsed. The default value
is 20, and it can be set to any non-zero number between 0 and 40
(including decimals, such as 0.3).
You can add, edit, and remove the update points of a publishing
group using the Operator View Publishing
Synchronization dialog, accessible from the Operator Views Synchronize
publishing... menu item. From this dialog, use the following
procedure to create and configure an update point:
-
Select the operator view containing the publishing group that
you want to modify from the Operator view(s) dropdown
list.
-
Select the publishing group that you want to modify from the
Publishing
group(s) section.
-
Create a new update point by clicking on the Add button in the
Update point(s)
section.
-
In the New Update
Point dialog, choose the event upon which you want this update
point to occur.
-
Optionally, specify a condition. When the update point is
reached, it will only be executed if this condition is met.
-
Click on the Ok button.
The procedure for adding and configuring clearing points is the
same as the procedure for adding and configuring update points,
except that it is done using the Displays annotations clearing
points section of the Operator View Publishing
Synchronization dialog. You cannot specify conditions for
clearing points.
While all elements in a publishing group are published at the
same time, there are some special considerations for annotations on
Display elements. Each Display element is linked to an image and
has a set of annotations that are non-destructively drawn on top of
the image. When a Display element is updated, both the image and
annotations are sent to the operator view. However, old annotations
are not removed from the Display element until after the next
clearing point. Clearing of annotations will be reflected next time
the Display element is published.
Annotations that are not cleared can consume a significant
amount of memory, potentially causing your project to encounter
out-of-memory errors. This is true even for Display elements that
are not currently being shown. For this reason, you might need to
create clearing points in addition to, or instead of, the default
clearing point at Inspection End.
User-defined
annotations are drawn less often than annotations that are
generated automatically by steps. The following table describes
when each type of annotation is drawn:
|
|
|
Step result annotation
|
Annotations are drawn after the step is executed.
|
|
User-defined annotation
|
Annotations are drawn at the first update point for the Display
element.
|