Inspection labels
Inspection labels are color coded tags applied to images in the Camera Images pane or the Filmstrip element in the operator view. Each inspection label has a name, a configurable foreground color, a predetermined background color, a value, a condition, and a visibility. When an inspection label is applied to an image, the name and value of the inspection label appear.
An inspection label's value is the result of an expression. For example, if an inspection label has its value set to BlobAnalysis.NumberOfBlobsFound, then when the inspection label appears, it displays the number of blobs found. An expression label can be visible based on a condition that evaluates to true or false, such as BlobAnalysis.NumberOfBlobsFound < 5. When an inspection label's condition is true, the inspection label is applied to the image. An inspection label's visibility determines whether the inspection label will be visible on the images in the Camera Images pane (design-time), the Filmstrip element in the operator view (runtime), or both.
By default, there is an automatically added label for each condition in the default Status step in the main flowchart.
 Types of
inspection labels
Types of
inspection labels
There are 3 categories of inspection labels: data, pass, and fail. By default, these are set to a background color of gray, green, and red, respectively. The data inspection labels display some information, such as a time stamp or loop count. A pass inspection label displays when an image passes its status step conditions and a fail inspection label displays when an image fails its status step conditions. Typically there will only be a single pass inspection label, but several fail inspection labels, one for every status condition that fails. The inspection labels can be quickly identified by their color (for example, green for pass and red for fail).
By default, a project starts with 4 inspection labels: T, Pass, Fail, and ErrorCaught. A T label displays a gray timestamp, Pass and Fail labels are discussed above, and an ErrorCaught label signifies that the Status step caught an error from either an Error step or another source. For more information, see the Catching and throwing exceptions subsection of the Procedure for using the Status step and Error step section in Chapter 23: Flow control steps.
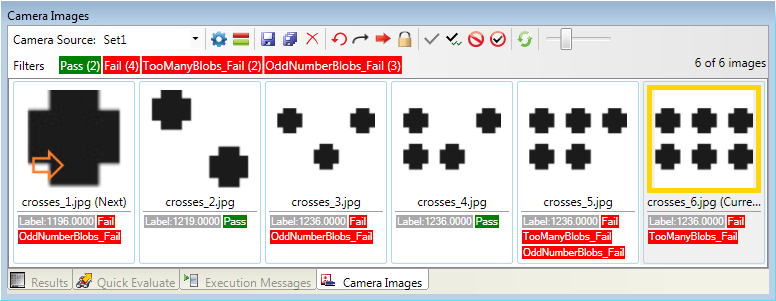
The following example shows a Camera Images pane with images and several inspection labels. The gray data inspection label is on all images and displays the size of the first blob found. The red inspection label called OddNumberBlobs_Fail is on the images that failed because of an odd number of blobs. The red inspection label called TooManyBlobs_Fail is on the images that failed because they have 5 or more blobs (note that after the inspection label name, the number of blobs in the image appears). The global inspection label called Fail is on the images that have one or more fail inspection labels. The green inspection label called Pass is on the images that passed all conditions in the Status step.
Creating
new inspection labels
There are multiple ways to create a new inspection label:
-
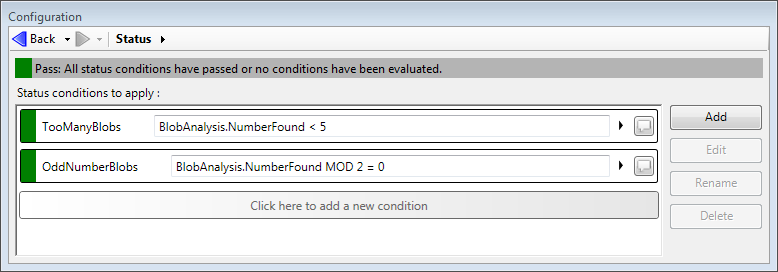
Add a new condition to a Status step. This is the most common way to add an inspection label and you should use it whenever possible. This will create an inspection label with a Fail condition in the Manage Inspection Labels dialog (further explained below), and the value field will be left blank. If you have more than one Status step in your project, use the Automatic Labels... button in the Manage Inspection Labels dialog to select which Status step will generate automatic labels. See the Procedure for using the Status step and Error step section in Chapter 23: Flow control steps for information. The image below demonstrates some conditions that have been added in the Status step and the results in labels from the previous image.
Note that if a Status step is part of a recipe, it cannot automatically generate labels.
-
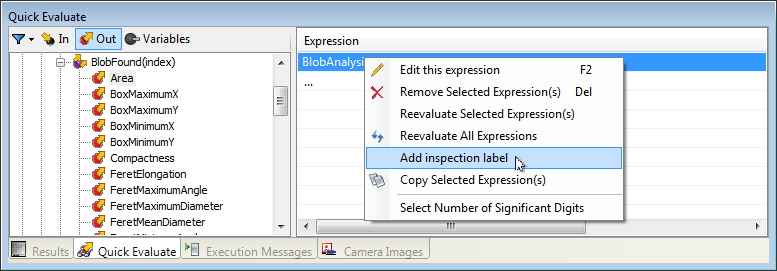
Select an expression in the Quick Evaluate pane, right-click it, and select the Add inspection label menu item. The Manage Inspection Labels dialog will appear, allowing you to modify your new inspection label. The new inspection label's value will be that of the expression selected and will have no condition. You might want to use this method if you want to display additional data to your images in the Camera Images pane. The image below demonstrates how to add an inspection label from the Quick Evaluate pane.
Note that you can easily add relevant expressions using the Quick Watch flyout panel. You can right-click data in the panel and select Add to Quick Evaluate to add them to the Quick Evaluate pane.
-
Click on Add in the Manage Inspection Labels dialog.
Manage
Inspection Labels dialog
To edit inspection labels, use the Manage Inspection Labels dialog, accessible from the Project menu or the toolbar of the Camera Images pane. You can also create new inspection labels from this dialog.
Edit an inspection label by selecting it in the dialog and clicking on the item to edit. Regardless of the category of inspection label, the default foreground color, used for the font, is white, and the visibility, used to determine where the inspection label is visible, is set to Both. Typically, you will add a condition for a data inspection label, and/or a value for a fail inspection label. You can also set the background color to create meaningful color-coded categories of inspection labels.
When adding an inspection label using the Manage Inspection Labels dialog, the default background color is gray, and the Value and Condition fields are empty. You must fill these fields manually, usually by copying and pasting from the Advanced editor of the Configuration pane of another step.
In the figure below, you see the Manage Inspection Labels dialog with the default inspection labels and the user-defined inspection labels. Note that when the Condition field is empty, the inspection label is always visible, but will still only appear in the locations specified in the Visibility field.
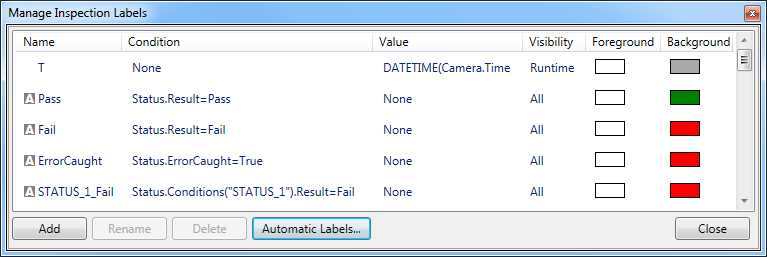
You can click on the Automatic Labels... button to have Status steps that are not part of a recipe create inspection labels automatically. You can see which labels have been added automatically by the symbol added to the left of their name.