
Configuration pane and editors
The Configuration pane lets you set the main properties of the selected step or operator view element. By default, the Configuration pane is found at the bottom-left of the user interface; for information on changing the pane's location, see the Panes overview section earlier in this chapter. Basic configuration can be made when you first access and use the pane. More advanced modifications can be made by clicking on the Link or Advanced editor buttons. To access these buttons, you can double-click on a property setting in the Configuration pane.
 Using the Simple
editor
Using the Simple
editor
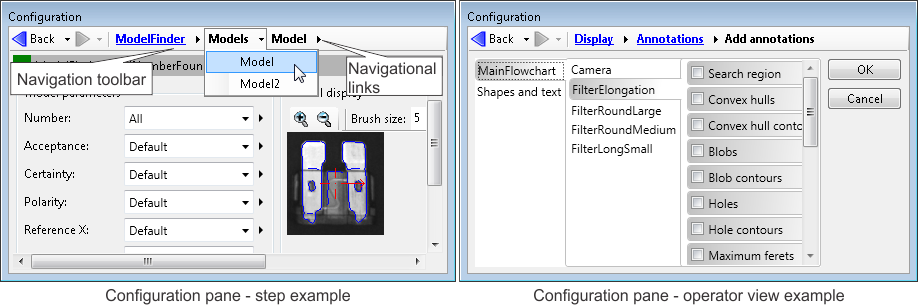
The Configuration pane has 4 typical layouts for displaying properties to be configured using the Simple editor:
-
Key properties. Displayed whenever a step is selected from the flowchart, or the root navigational link is clicked. This layout presents all the properties that are typically required to configure a step.
-
Single property. Displayed whenever you select a single property (for example, the Camera step's ExposureDelay property) from the Quick Access pane or Properties pane. Either select or enter the value for the single property in the dropdown list that appears.
-
Group properties. Displayed whenever you select a property that has several properties directly associated with it (for example, the EdgeLocator step's SearchRegion property). Select an associated property from the list that appears and enter its value in the dropdown list.
-
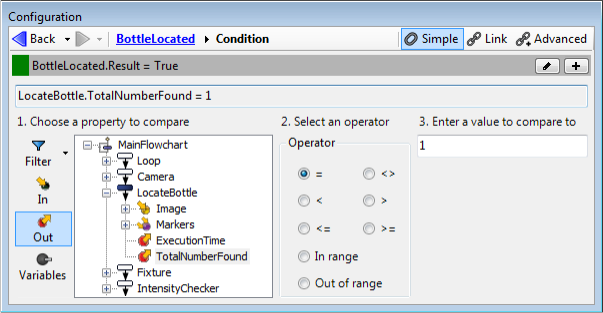
Condition properties. Displayed when you select a Condition step, or when you are setting a condition in another step. This layout allows you to select (link to) an input or output property of a step in your project, and compare it to a user-defined value. In addition, you are asked to select a comparison operator and enter a value with which to compare a selected property. If your condition requires 2 links, switch to the Advanced editor.
If the value that you assign to a property is invalid, an exclamation point inside a red circle appears next to the property in the Configuration pane. For more details, read the error message that appears in the Errors pane. The information presented should help you locate and fix the error.
If a step input is bound to an operator view input element, a
 icon will be displayed next to it. See the
Binding subsection of the
Configuring input elements section in
Chapter 50: Customizing the operator view for more
information.
icon will be displayed next to it. See the
Binding subsection of the
Configuring input elements section in
Chapter 50: Customizing the operator view for more
information.
Using the Link
editor
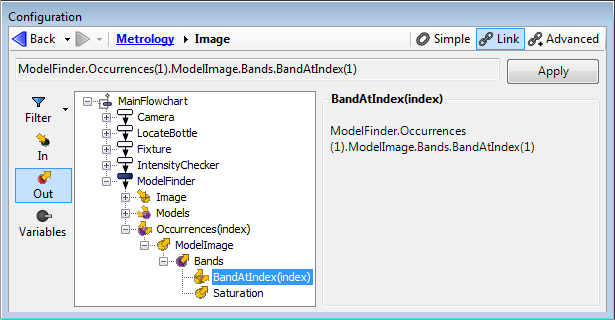
When the Link editor is accessed, the Configuration pane displays a tree structure that allows you to set the selected property to the value of a specific input, output, variable, or platform configuration setting already in your project. Typical use of the Link editor includes constructing conditions or linking an output to a value in the Operator View Layout tab.
To use the Link editor, perform the following:
-
Click on the In, Out, or Variables button beside the tree structure. This changes the list of items from properties that are set (inputs) to results that return a value (outputs) or variables (or vice versa).
If the size of the pane is too small to see all 3 buttons (the In, Out, and Variables buttons), a little triangle appears to the right of the visible buttons; clicking the triangle displays the missing ones.

-
Click on the plus sign next to a step to display its related properties. When selecting an output property, you can filter out categories of properties using the Filter button just above the In button.
-
Double-click on the property to which you want to link. The text box above the tree structure will change to show the name of the step and the property to which you have linked.
Using the
Advanced editor
The Advanced editor is used to build expressions. For information on building expressions, refer to Chapter 26: Building Expressions and Appendix A: Expression syntax.
You can access the Advanced editor from the Configuration pane by double-clicking on any text box, or pressing the F8 key.
To add to an expression, do any of the following:
-
Select properties, functions, and operators from a category.
-
Drag and drop links into the expression window.
-
Type directly into the text box.
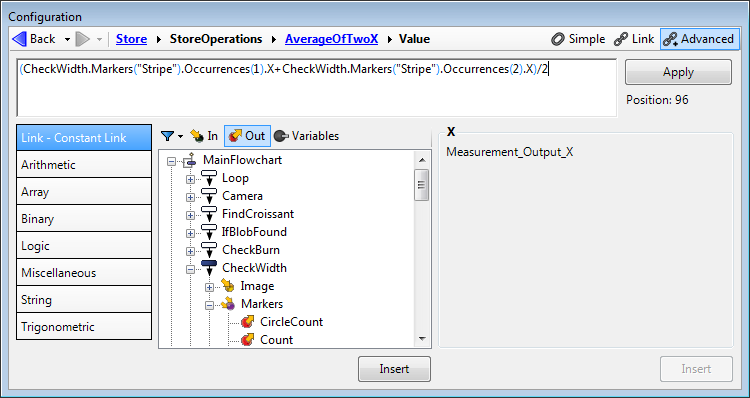
When you access the Advanced editor, the Configuration pane displays the following categories from which to build an expression:
|
Category |
Description |
|
Link - Constant Link |
Consists of links to inputs, outputs, variables, and constants in your project. For information on linking to constants,see Constant links. Note that this category allows you to add links in the same way as Link editor. |
|
Constants |
Consists of valid constants for the selected property or element. For example, if you select a Condition step, only True and False are listed as possible constants. This category is only displayed if constants are available for the selected property or element. |
|
Arithmetic |
Consists of arithmetic operators and functions, including MIN, MAX, and MOD. |
|
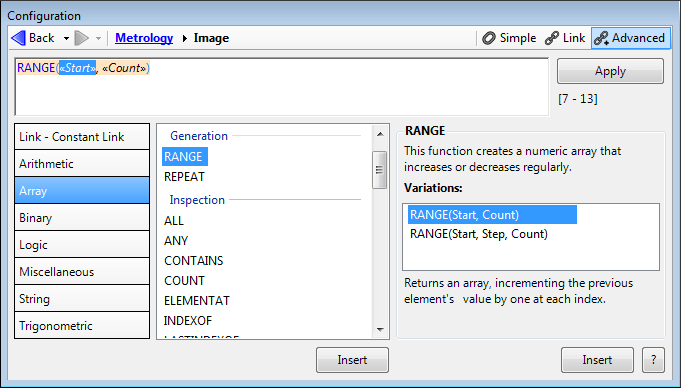
Array |
Consists of operators and functions that work with an array, such as looking up or extracting an element from the array, calculating the average of all values in the array, or converting the array to a string. |
|
Binary |
|
|
Logic |
Consists of logical operators and functions, such as greater than (>) and INRANGE. Note that the logic functions ending with the letter "W" return 3 possible states (Pass (2), Warn (3), or Fail (4)), while the others return 2 (True (1) or False (0)). |
|
Miscellaneous |
Consists of general utility functions, such as functions to format the date and time, check if a link is valid, manage recipes, manage files, and identify networks. |
|
String |
Consists of functions that work with a string, such as extracting parts of a string, converting a string to a numeric value, and determining the number of characters in a string. Functions that operate on 2 strings allow comparing, finding, and concatenating. |
|
Trigonometric |
Consists of trigonometric functions, such as COS or TAN. The angle is expressed in degrees. |
Some of these categories also contain keywords. For example, the ARRAY category contains the ItemCount keyword (to denote the number of elements in the source array).
The Advanced editor has several uses. It can be used to build input expressions using results from other steps (for example, to set the location of a test region based on the average of 2 previously determined points). An expression calculating the average of 2 X-coordinates is shown below.
An expression can also be used to verify if a result falls within a given range. For example, in the following expression with 3 links, logic operations are used to check if a point of intersection, calculated in the Metrology step, lies inside the image.
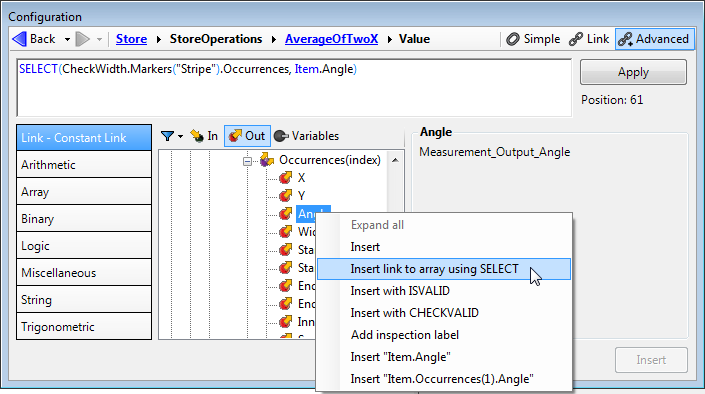
In the Advanced editor, you can also quickly extract a particular result element, of all occurrences, by selecting the required menu item from the Advanced editor context menu, as shown in the following example.
When linking to data of type array (collection), you can right-click on the array to access the context menu; this provides options to select the entire array, or the first indexed item of the array. For more details, see the Referencing array elements subsection of the Arrays as variables section in Chapter 27: Using arrays.
When you select a function from the list of available functions in a group, the Advanced editor displays all possible variations of the function and a short description. For more information, click on the question mark button or press F1 to go to the reference document that gives more explanations and usage examples.
Advanced
editor and syntax errors
If there is an error in the expression, an error message appears above the expression in the Advanced editor of the Configuration pane and in the Errors pane. The information presented should help you locate and fix the error.
To simplify working with complex expressions, the expression is syntax color-coded. When you click on a function with parameters, all of the text belonging to that function is highlighted to help check for mismatched parentheses.

Also, note that, to improve readability of long expressions (such as the one below):
you can insert breaks using the Shift+Enter key combination:

Advanced
editor and runtime errors
Advanced editor and
the Operator View Layout tab
Advanced editor and number
formatting
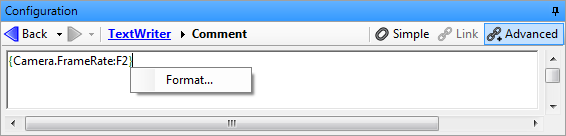
When an expression that generates a text value includes links to numeric results, you might need to control the formatting of the numbers (for example, the number of decimal places to display). By default, a format with 2 decimal places is specified, as indicated by the string F2 at the end of the following expression:
To change the formatting, you can right-click on the expression:
Clicking on Format... opens the Customize Expression Format dialog, allowing you to, for example, modify the number of decimal places to display.
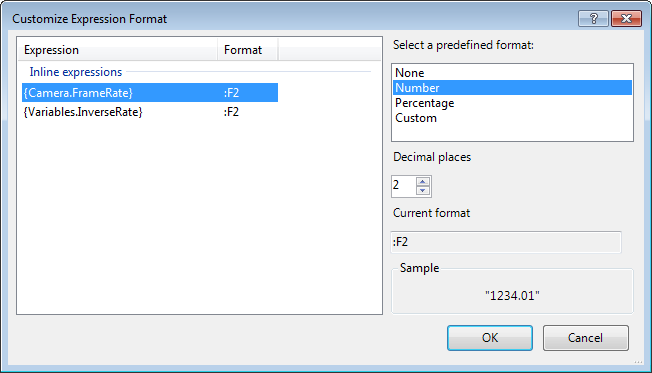
If the expression contains multiple numeric links, you can set each one individually. For more information about numeric formats, see the User-defined date/time and number formats section in Appendix A: Expression syntax.