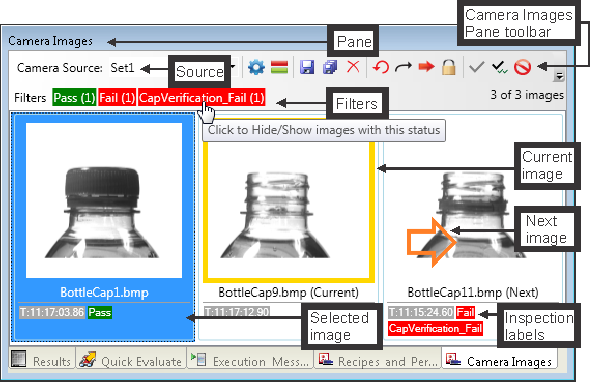
Camera Images pane
The Camera Images pane manages and displays which images each Camera step uses. By default, the Camera Images pane is found at the bottom-right of the user interface; for information on changing the pane's location, see the Panes overview section earlier in this chapter. You can switch between using live images from the camera, using a set of past images taken from the camera, and using an image set. You can set the source of the images in the Camera Source dropdown list. If you have more than one Camera step, you can select to which Camera step the camera source applies. To manage which images to use for a Camera step, use the Camera Images Pane toolbar, located at the top of the Camera Images pane.
 Camera source
Images in
the Camera Images pane
The Camera step will iterate through the images that appear in the Camera Images pane in the order they appear in the pane. The current image being processed and the next image to be processed are highlighted. When grabbing live images, the current image is typically the last image in the pane.
Running on a
subset of images
To have the Camera step only access a subset of the total group displayed, there are a number of options, selectable using the Camera Images Pane toolbar buttons. Specifically, you can:
-
Lock on a single image, using the Lock (
 ) toolbar button. This will use this image repeatedly
for each iteration.
) toolbar button. This will use this image repeatedly
for each iteration.
-
Select several images to iterate through, using the Include selected images (
 ) toolbar button.
-
Iterate through the entire set once, continuously, or until the first failed image; using the Run to last image (
 ), Run
continuously (
), Run
continuously ( ), or Stop
on fail (
), or Stop
on fail ( ) toolbar buttons, respectively.
-
Manually set which image will be used next by double-clicking on it, or by selecting the required image and clicking on the Set next (
 ) toolbar button.
Note that these settings only apply at design-time, not in deployed projects.