
Procedure for configuring image sets
Each image in an image set can be explicitly specified or generally specified (for example, having the same root name in a specified folder). You can define multiple distinct image sets; each set can use different design-time and/or runtime images. In addition, each set can use a subfolder of a specified folder per recipe (see the Recipes overview section in Chapter 55: Recipes). The currently selected image set is displayed in the Camera Images pane.
 Adding
and configuring an image set
Adding
and configuring an image set
To define an image set and the images that it includes, perform the following:
-
Access the Platform Configuration dialog, by clicking on the Configure platform (
 ) toolbar button in the
Platform toolbar. Open the Image Sets page, and if
present, select the name of one of the possible image sets (for
example, Set1). If there are no image sets listed, click on the
Add button.
Then, specify the name for the new image set, and click on the
Configure
button. In the following steps, this new image set will be named
SetN.
) toolbar button in the
Platform toolbar. Open the Image Sets page, and if
present, select the name of one of the possible image sets (for
example, Set1). If there are no image sets listed, click on the
Add button.
Then, specify the name for the new image set, and click on the
Configure
button. In the following steps, this new image set will be named
SetN. -
On the SetN page, select the source of your image(s) from the Image Source dropdown list. It can be one of the following:
-
Folder. Specifies to use all the images in the specified folder. The images in the folder can be limited by file type using the File types dropdown list.
-
NumberedFiles. Specifies a folder containing a set of numbered image files. See the Numbered image files subsection, later in this section.
-
SequenceFile. Specifies a sequence file, which is a text file that lists the file names of the images to use. See the Sequence file subsection, later in this section.
-
SingleFile. Specifies to use a single image file.
When using multiple images, you can specify to use them in forward or reverse sequence using the Direction dropdown list.
-
-
Set the source path for the design-time and runtime image(s).
-
Optionally, if you have images associated with a recipe used by your project, you can append the recipe's subfolder to the path by selecting the Append recipe subfolder option. Note that if your project does not use a recipe, this option should remain unselected.
-
Optionally, to include images stored in subfolders, select the Include subfolders option.
-
Verify that the image set's options are set as expected. By default, the Convert to grayscale option is enabled because most Analysis and Processing steps require a grayscale image. For information on color conversion options and fine-tuning the conversion, see the Dealing with color images section in Chapter 2: Building a project.
-
Set the Mode input. Software trigger mode iterates through the images in the image set via a Button element linked to a Software Trigger action in the operator view, or via a Trigger step. Continuous mode loops through all the images without waiting for user-interaction or a timed software trigger.
You can change the Camera Source input of a Camera step to switch between acquiring images from a camera and from an image set while the project is deployed. This can be done entirely through the operator view. See the Switch between camera or disk example subsection of the Controlling image acquisition from the operator view section in Chapter 50: Customizing the operator view.
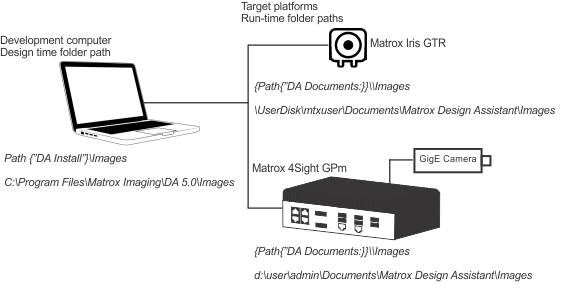
Design-time folder and
runtime folder paths
The folder from which to take the images can be the same at runtime as it is at design-time, or they can differ. They can be stored locally on your runtime platform, locally on your design-time platform, or stored elsewhere on the network. To specify different design-time folder and runtime folder paths for your image sets, specify the design-time folder and runtime folder on the SetN page (under the Image Sets page of the Platform Configuration dialog). If the files are stored remotely (that is, in a network folder), you need to verify that your platform has access to that folder.
At design-time, to copy the selected image set for design-time over to the runtime platform, use the Copy images to the target platform button (in the SetN page).
At the bottom of the SetN page are statistics showing the number of images at design-time and at runtime (that is, the number of images stored locally and the number of images stored on your runtime platform). This list is the only way to ascertain, through Matrox Design Assistant, that the same number of required images is present in the respectively specified design-time and runtime folders.
For information regarding paths, see the Specifying a path section in Appendix A: Expression syntax.