- - or -
Controlling image acquisition from the operator view
It is often convenient for an operator to switch from using the camera to acquire new images, to using images stored on disk. This can be accomplished using only operator view elements, without any additional flowchart steps. Once this is set, you can also choose different trigger methods and camera setups for acquiring both live camera and disk images. To see how this could function, open the Switch between camera or disk example, accessible by clicking on the Browse Examples link on the Quick Start tab.

 Switch
between camera or disk example
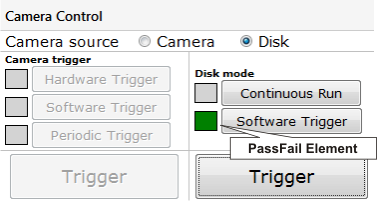
The focus of the example is on the following table in the operator view:

The table uses a radio button to allow the operator to select between acquiring images from the camera or from disk. Upon selecting a Camera source, either the Camera trigger or Disk mode buttons are enabled. Depending on which button you click, the accompanying PassFail element will turn green. If you click on the Software Trigger button in either the Camera trigger or Disk mode, the Trigger button become available. This button will manually trigger a single image capture from the camera or iterate to the next image from the images on disk, respectively. The Periodic Trigger and Hardware Trigger buttons will capture new images from the camera either based on a set period, or a hardware trigger, such as a manual switch. For more information on different triggers, see the Triggering section in Chapter 28: Acquisition.

 Setting up the
example
There are 2 main points to the example: selecting the camera or image settings using a button, and providing feedback for good user interface design. The following section is best read while looking at the Switch between camera or disk example.

 Selecting the camera or
image settings
In the example, there are 3 buttons that change camera settings in Camera trigger mode, and 2 buttons that change image set settings in Disk mode. At its most basic, buttons can be assigned an action, and one of the available actions is to change a Camera or ImageSet setting. When a button is assigned a Camera Settings action, it will change the camera settings, as per the button setup, whenever the button is clicked. The button is equivalent to changing the camera setting using the Platform Configuration dialog. Note that changing an ImageSet setting does not switch between multiple image sets. The only way for the operator view to switch between image sets is to link Camera.CameraSource to another input element.
Each Camera trigger button changes the trigger settings. The image set setting allows you to select the image set to use, and the run mode. In both the Camera trigger mode and Disk mode, there is a Trigger button that initiates a new grab. To set up the Trigger button, select the Software Trigger action, and set the image source. Note that a Trigger button can only be used for a single image source.
For more information on buttons and their actions, see the Buttons section earlier in this chapter. For more information on camera settings, see the Platform settings for your camera section in Chapter 28: Acquisition. For more information on Image sets, see the Procedure for configuring image sets section in Chapter 29: Acquisition using image sets.

 Advanced UI
design
In the example, depending on which radio button is selected, the trigger buttons in one mode are grayed-out, while the others remain active. This is also true for the Trigger button that is active only when the Software Trigger button is selected. This functionality is a result of the Enable property of each input element. When the value is False, the input is grayed-out and is inoperable. By putting a boolean expression or variable in the Enable property, you can control when the input element is grayed-out by controlling the expression or variable.
In the example, the radio buttons are bound to Variables.CameraSource, a string variable. The string will be either "PhysicalCamera1" or "Set1" for the Camera and Disk radio buttons, respectively. The Enable property of the buttons in the Camera trigger mode are all Variables.CameraSource = "PhysicalCamera1", and the Enable property of the buttons in the Disk mode are all Variables.CameraSource = "Set1". When a radio button is selected, Variables.CameraSource is one string or another, and one set of buttons will have their Enable property as True, and the others will be False. The same principle applies to the buttons themself. Each button has the dual action of controlling a Camera or ImageSet setting and setting a variable. The Enable property of the Trigger button is dependent on this variable as well as Variables.CameraSource.
In addition to graying out an input element, you can add a PassFail element to designate that an option has been selected. In the example, next to some buttons there is a green or gray square that shows that a button has been clicked and which trigger mode the operator view is currently in. The Condition property of the PassFail element is set with a boolean expression that includes the variables updated by the accompanying button. When the button is clicked, the button's variable is set, and the accompanying PassFail element becomes green. Otherwise it is Gray.