
Dealing with color images
Matrox Design Assistant supports color acquisition. Color processing is supported with the ColorMatcher step and with certain operations in the ImageProcessing step.
Color images contain 3 bands of data. Images grabbed in color mode from a color camera have red, green, and blue bands. Note that many of the Matrox Design Assistant steps only accept 1-band images.
 Generally
working with color
Generally
working with color
In some cases, it is more appropriate to convert the image to another format (for example, Hue (color information), Saturation (strength of the color), and Luminance) which is proportional to the intensity that would be captured with a monochrome camera. The ImageProcessing step has a Convert operation in the Copy and Convert category (along with Fill, Copy, and CopyConditional) that lets you convert an incoming RGB image into either a 3-band HSL image or into a 1-band image containing either hue, saturation, or luminance. On the first page of the Configuration pane of the ImageProcessing step you can specify if you want to produce a 1 or 3-band resulting image.
When a 3-band image is saved to a file, the color space type (RGB or HSL) is not saved in the file. By default, a 3-band image is considered to be RGB. If you have saved an HSL image and want to load it either through the Camera step, the LoadImage step, or through the static image repository, you must indicate that it is an HSL image using the Type property.
By default, when you add a step that only works with grayscale, the image will convert to grayscale using the image's luminance band. However, sometimes you might still receive a message indicating that the input image is not valid because the step only works on grayscale images. You will be prompted to select one band of your color input image, or to use an image processing step to convert the input image to grayscale. Perform one of the following options to clear this message.
-
If the camera used to grab images supports both color and monochrome, you can choose to set the camera color mode to grayscale in the Platform Configuration dialog. You will need to re-grab your images so they appear in grayscale.
-
If the project will not be using the color information, select the Convert to grayscale option in the Image sets page of the Platform Configuration dialog. By default, the Camera step will produce 1-band images (that is, grayscale images).
-
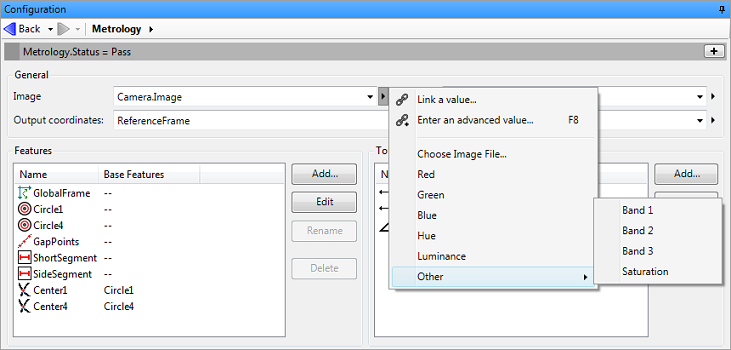
You can choose to work on one band individually, by linking the analysis step's Image property to one of the bands specified in the Alternate menu (sideways triangle). For an RGB image, selecting Red, Green, or Blue will extract that band from the original image, while selecting Hue will perform a conversion to produce a color-dependent hue image. Selecting Luminance will provide a grayscale equivalent of the original image. Note that if you have already used image processing to convert to an HSL, 3-band image, HS and L are available. Selecting Other gives access to the less commonly used Saturation (which requires that you are working with an image that has already been converted to HSL using an explicit ImageProcessing step). Other also offers the generic Band 1, Band 2, and Band 3 options.
-
Use the ImageProcessing step to produce a Luminance image (RGB to L) that you can use for operations such as locating or matching.
In Matrox Design Assistant, color components in a tree structure can also be referenced by color band with an index value, using the BandAtIndex notation. This is useful if the index depends on elements such as a variable or a loop counter.
-
Red: Camera.Image.Bands.BandAtIndex(1).
-
Green: Camera.Image.Bands.BandAtIndex(2).
-
Blue: Camera.Image.Bands.BandAtIndex(3).