
Connecting to a runtime platform
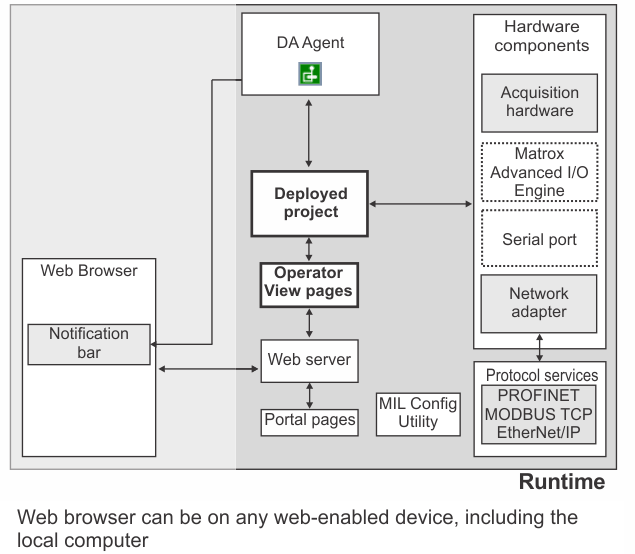
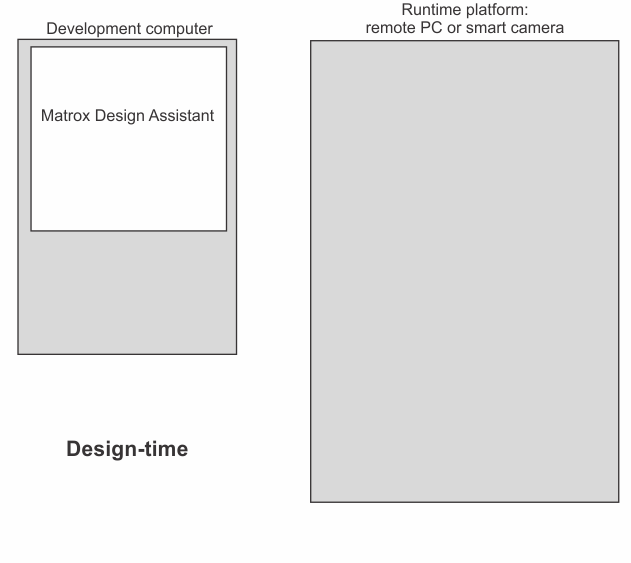
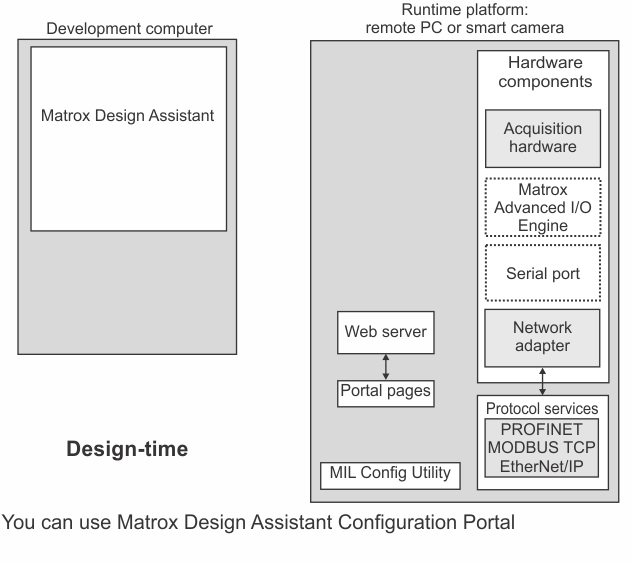
Before working on a project (design-time), you must connect to a runtime platform, or emulate connecting to a runtime platform. A Matrox Design Assistant runtime platform is a collection of hardware and software components on which projects can be deployed and run. Some components are required and some are optional.
Note that if the runtime platform has sufficient resources, more than 1 project can run simultaneously. For more information, see Chapter 60: Running multiple projects on a runtime platform.
 Runtime
platform components
Runtime
platform components
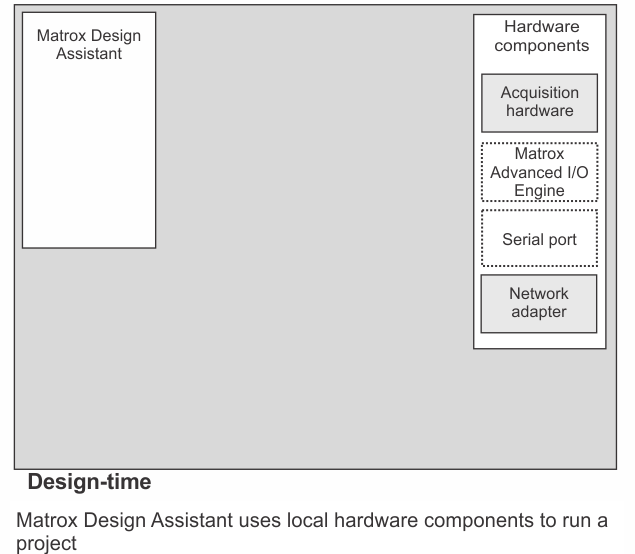
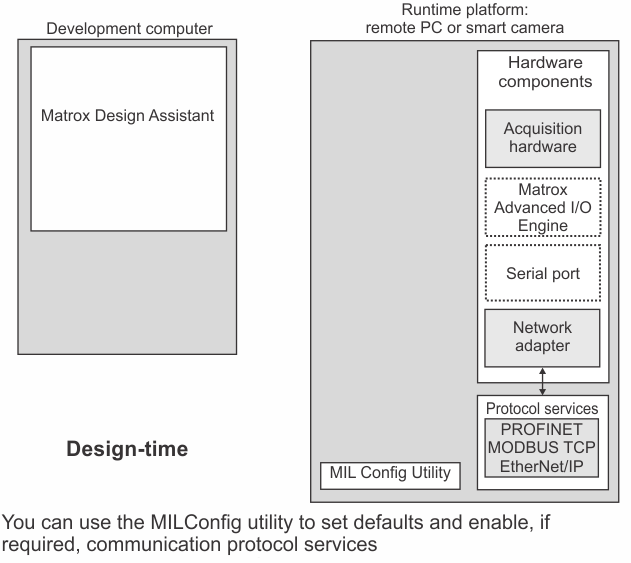
Matrox Design Assistant can use a PC or a supported Matrox smart camera as a runtime platform (for example, Matrox 4Sight GPm and Matrox Iris GTR, respectively). When using a PC as the runtime platform, it should be connected to one or more GigE Vision cameras, USB3 Vision cameras, or other supported third-party sensors. In the latter case, if your sensor is not directly supported, contact your Matrox sales representative. A runtime platform must also have a network component. In addition, Matrox Design Assistant can make use of some optional hardware components, if present, such as digital I/Os, serial ports, and accelerators for industrial communication protocols (for example, the Matrox PROFINET Engine).
Some hardware components (such as Matrox Indio) must be represented in a Matrox Design Assistant project with a system component before you can access the physical component (for example, any auxiliary input/output signals). Typically, this happens automatically.
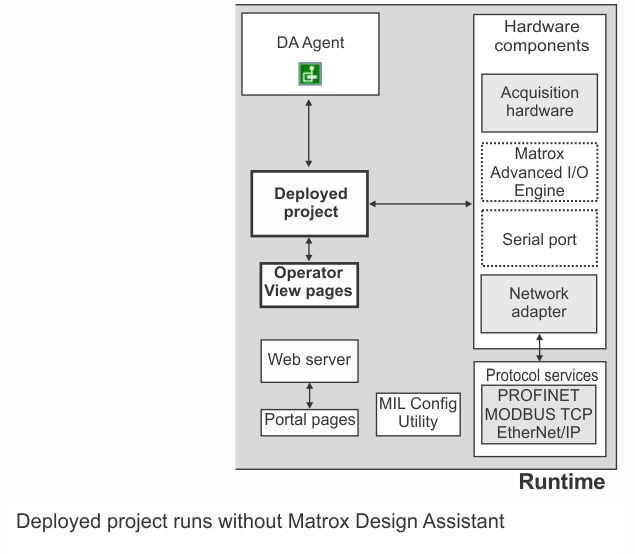
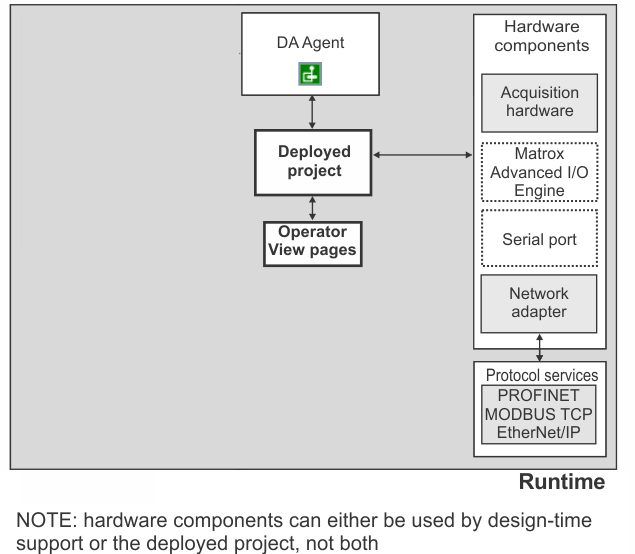
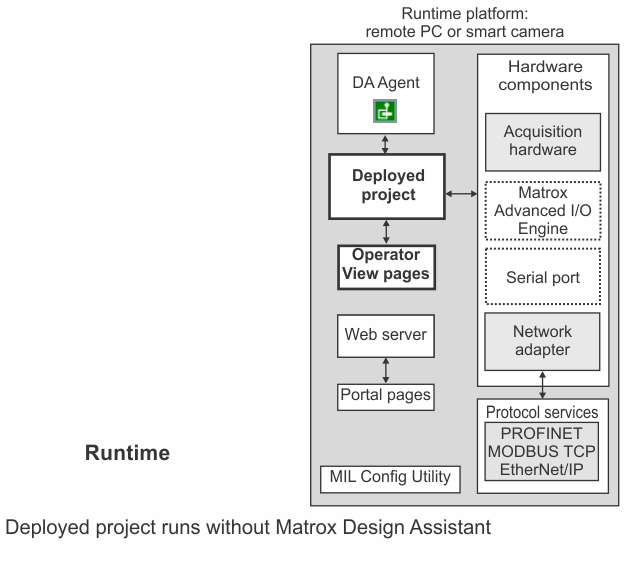
A runtime platform must also include a few software components, which are referred to collectively as the runtime environment. The most important parts of the runtime environment are:
-
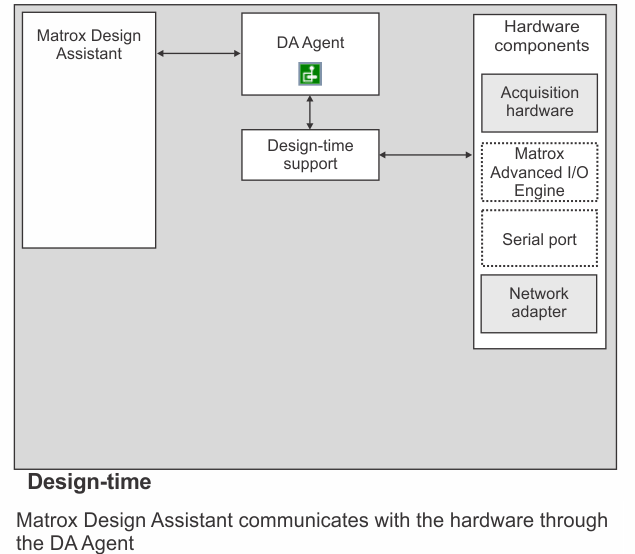
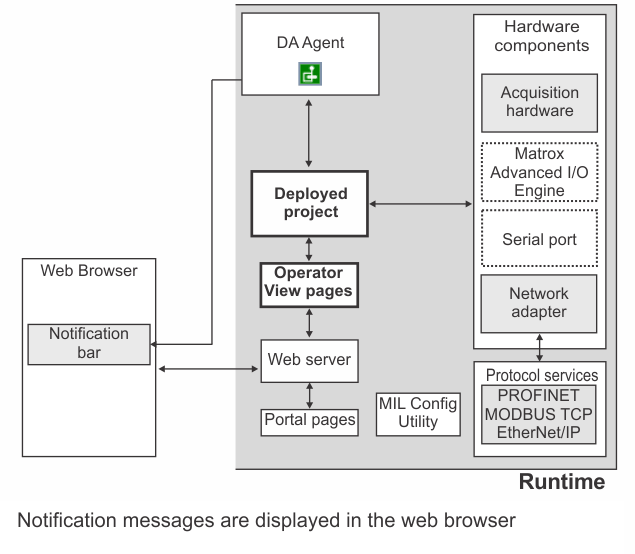
DA Agent. Manages communication and hardware access to the runtime platform. It acts on behalf of a running Matrox Design Assistant design-time IDE. It is a continuously running task which shows its status on a PC runtime platform by the color of the Matrox Design Assistant notification icon in the taskbar. The icon has 3 colors.
Color
Icon
Description
Red

The task has stopped.
Gray

There are licensing issues.
Green

The task is running.
-
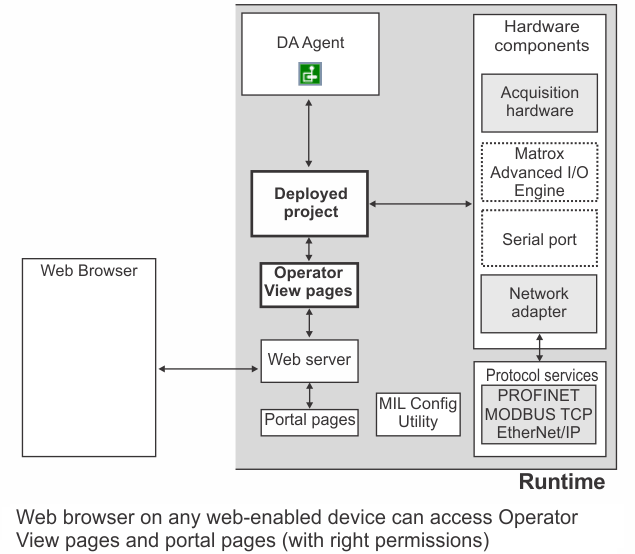
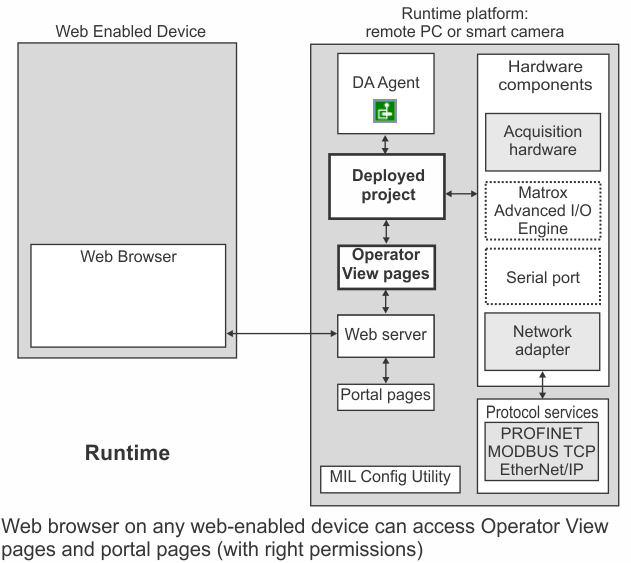
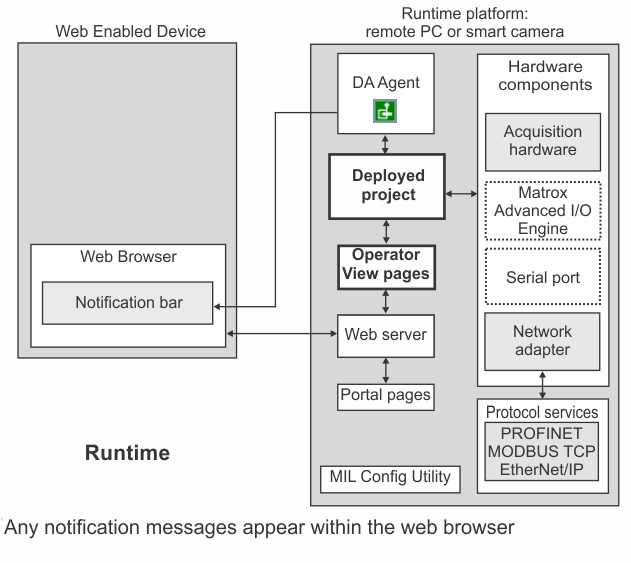
Website serving the Matrox Design Assistant configuration portal pages and the running project's operator view pages. If the website cannot start (for example, if some other process has taken the http port 80), then a warning triangle appears over the DA Agent icon:

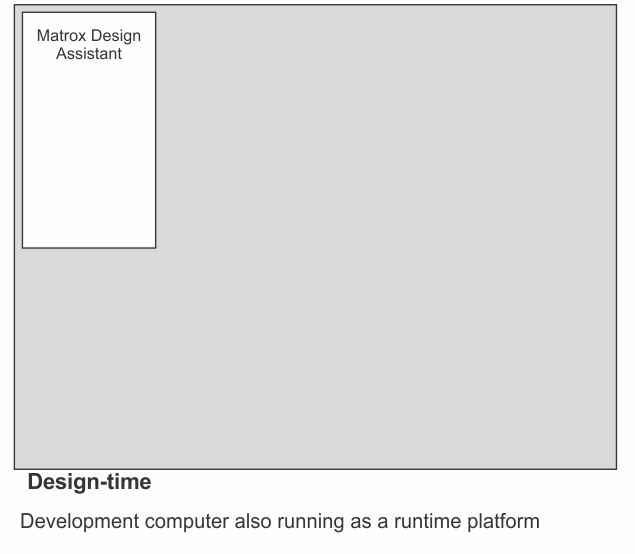
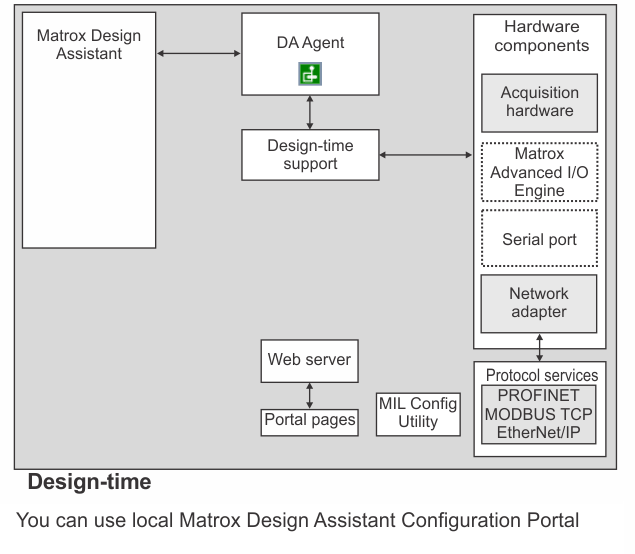
Matrox Design Assistant setup allows you to install the design-time environment, the runtime environment, or both, on a computer.
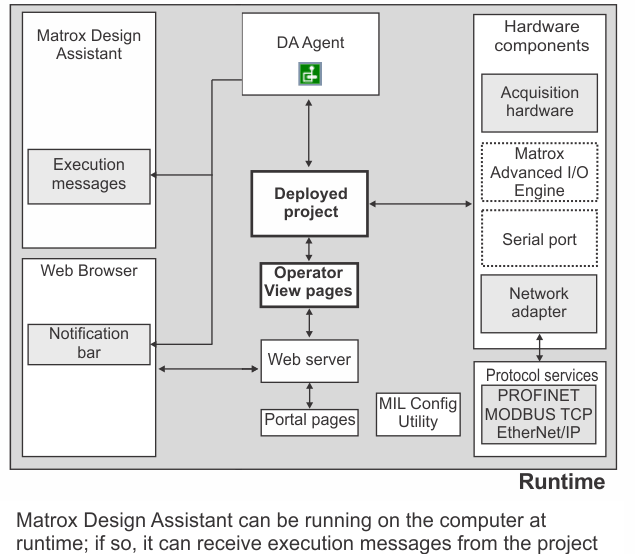
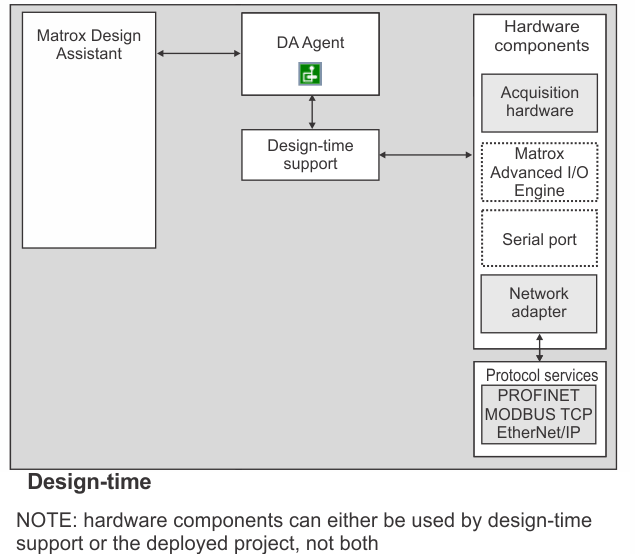
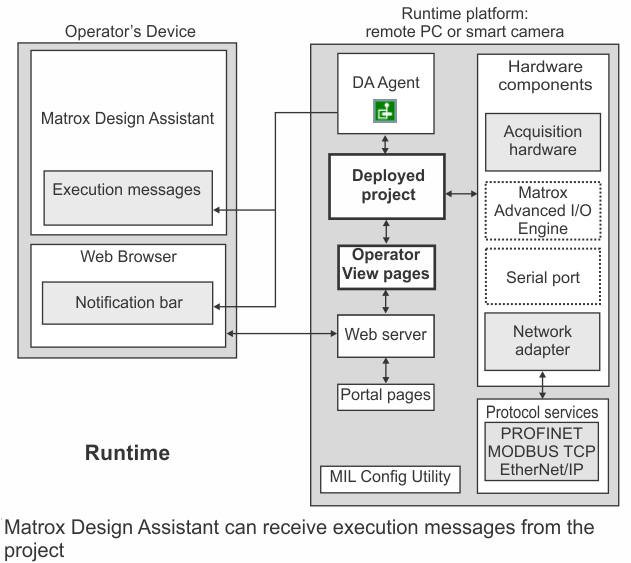
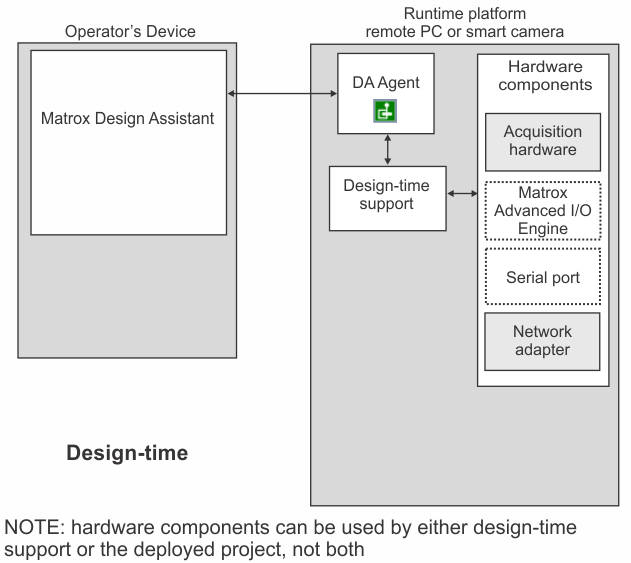
At design-time, Matrox Design Assistant runs on the development computer and only communicates with the runtime platform, through the DA Agent, to access its hardware components.
How to
connect to a runtime platform
When you start Matrox Design Assistant, you are prompted to connect, or emulate connecting, to a runtime platform. You can do so by selecting one of the following from the Interface Actions pane:
-
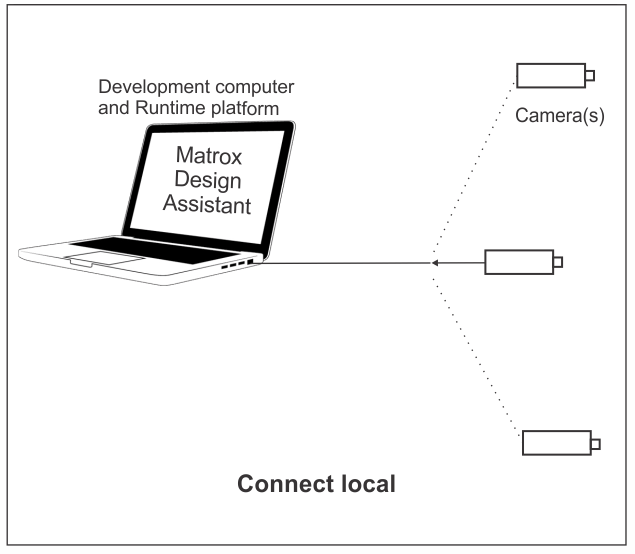
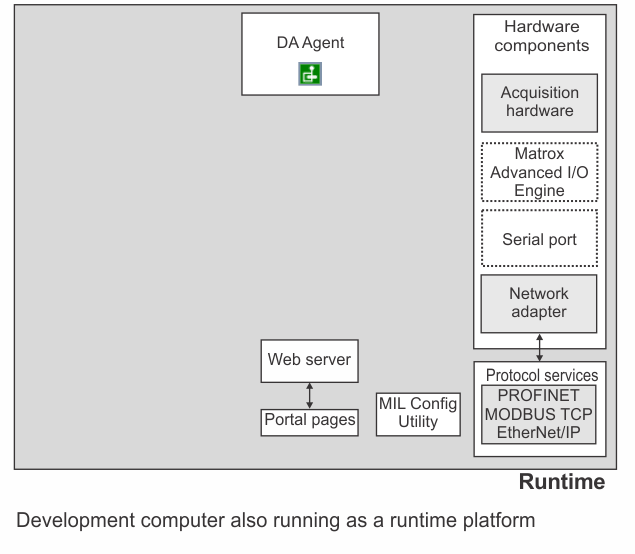
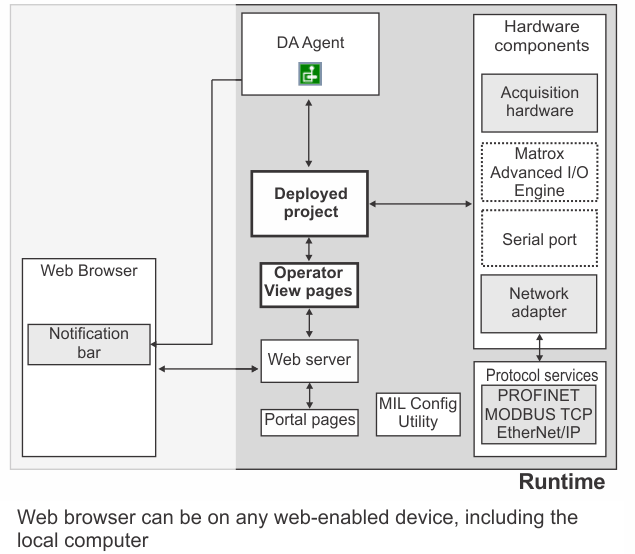
Connect local. Establish a connection between the design-time and the runtime environment installed on your computer. This connection allows Matrox Design Assistant to communicate with one or more GigE/USB3 Vision cameras (such as Matrox GatorEye). Connecting to your local computer allows you to design and test your project locally, deploy on your local computer, and use any connected GigE/USB3 Vision cameras to run your project.
-
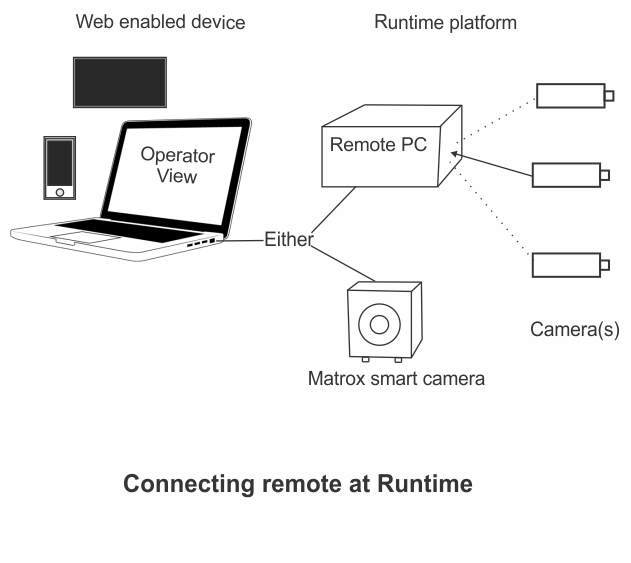
Connect remote. Establish a connection between the design-time environment and runtime environment on a remote runtime platform (either a supported Matrox smart camera or a remote computer). This connection allows Matrox Design Assistant to communicate with the remote runtime platform, allowing you to test and eventually run your project (deploy it).
-
Start emulation. Run Matrox Design Assistant in emulation mode. This allows you to run Matrox Design Assistant without connecting to a runtime platform. You can build and configure flowcharts and test processing steps, using images from files.
Requirements to
connect
Switching
runtime platforms once connected to a runtime platform
Connecting
with your local PC as your runtime platform
To use your local computer as your runtime platform, click on the Connect local link in the Interface Actions pane or use the Platform Connect local menu item. This uses your local computer as the development computer and sets up the conditions to allow you to deploy your project locally.
If an error occurs when you try to connect to your local computer, refer to the Appendix C: Troubleshooting appendix or the Troubleshooting section of your Matrox Design Assistant Readme file.
Once Matrox Design Assistant (through the DA Agent) establishes a connection with the runtime environment on your local computer, the New Project, Open Project, and Import Project links in the Interface Actions pane become available, and Connected to localhost appears in the title bar of the window.
The following animation demonstrates using a local computer as a runtime platform.


Connecting
with a remote PC or Matrox smart camera as your runtime
platform
To use a remote computer as a runtime platform, click on the Connect remote link in the Interface Actions pane or use the Platform Connect remote menu item. This will open the Connect to platform dialog. To create the connection, you must specify the network name or the IP address of the remote PC or Matrox smart camera.
Note that to be able to connect, the remote PC must have an installed runtime environment of the same Matrox Design Assistant version and a build number that is the same or lower.
If an error occurs when you try to connect to a remote computer, refer to the Appendix C: Troubleshooting appendix or the Troubleshooting section of your Matrox Design Assistant Readme file.
Once Matrox Design Assistant (through the DA Agent) establishes a connection with the runtime environment on your remote computer, the New Project and Open Project links on the Interface Actions pane become available and Connected to PlatformName appears in the title bar of the window.
At runtime, a project can access the name of the runtime platform on which it is running, using the HOSTNAME function.
The following animation demonstrates using a remote computer as a runtime platform.


Emulation mode
In emulation mode, you can work with Matrox Design Assistant without connecting to an actual runtime platform; however, in this mode, you can only work with stored images, and all the communication steps will be skipped.
Although you do not connect to an actual runtime platform, emulation mode lets you mimic one, such as a supported Matrox smart camera or a Matrox 4Sight GPm, using the Platform Configuration dialog. By specifying a particular runtime platform type, it is possible to configure hardware-specific features such as the auxiliary I/O Engine. This can be useful when working on a project that has I/O pins in the design. By emulating the runtime platform for which the project was originally designed, you can ensure that your project will not generate errors due to an insufficient number of I/O pins (allowing you to work on, or debug, other aspects of such projects).
To use emulation mode, click on the Start emulation link on the Interface Actions pane or use the Platform Start emulation menu item. Once emulation mode begins, the New Project and Open Project links on the Interface Actions pane become available, and "Emulation started" appears in the Matrox Design Assistant title bar. Although Matrox Design Assistant is fully functional in emulation mode, note that:
-
You cannot grab live images. Instead, use image sets to select any image(s) to work on.
-
You cannot access communication hardware; IO steps, Serial Port steps, Network steps, Modbus steps, EtherNet/IP steps, PROFINET steps, the TextReader step, the TextWriter step, and the ImageWriter step will be skipped. This is equivalent to setting them offline using the Communications (
 ) toolbar button in the
Platform toolbar.
) toolbar button in the
Platform toolbar. -
An emulation session lasts for 24 hours at a time. If a project is opened after that period, it will be automatically saved and closed, and emulation mode will end.
-
You can end emulation mode using the Platform End Emulation menu item, which is available when there is no open project.