Collapse
CollapsingX
  • - or -

TextWriter step overview


The TextWriter step is used to generate text files (such as log and report files). These files can be stored locally on your runtime platform, or on a shared network drive.

The path, file name, and text used by the TextWriter step can all be generated using expressions. For more information, see the Generating text using expressions subsection of this section.

Procedure for using the TextWriter step

The following is a basic procedure for using the TextWriter step:

  1. Specify the Path of the folder in which to store the text file. The default folder is {PATH("DA Documents")}\\SavedTextFiles. To determine what this evaluates to on your runtime platform, see the PATH function. For information on specifying a different folder, see the Specifying a path section in Appendix A: Expression syntax.

  2. Specify the File name, including file extension.

  3. Specify the Operation to perform.

  4. If you have set the Operation property to Write, specify the Text to write to the file.

Operations

There are 4 operations that the TextWriter step can perform :

  • The Create operation creates a new, empty file. If a file with the specified name already exists at the specified location, the existing file will be overwritten by the new one.

  • The Open operation opens the specified file.

  • The Write operation appends the string specified in the Text property to the end of the specified file. If WriteNewLine is selected, the text is written on a new line at the end of the specified file. The text file is saved immediately after every Write operation.

  • The Close operation closes the specified file.

Note that other editors will not be able to write to the file until it has been closed.

The Open and Create operations will be performed automatically if the specified file does not exist or is not already open in your project. Opening a file can take a substantial amount of time, particularly if the file is being accessed over a network. It can be useful to execute an Open or Create operation outside of the main loop so that this delay does not interfere with inspection. Once a file has been opened for writing (automatically or manually), it will remain open until your project ends, or the file is closed manually using the Close operation.

Avoiding errors when accessing results

When using the TextWriter step to record inspection results, you must consider what will happen when there are no results to access. If a step in your project attempts to access data that does not exist (for example, accessing the position of a model occurrence when no occurrences have been found), it will generate a runtime error. If there is no Status step in your project, this error will cause your project to terminate immediately.

The Status, NumberFound, TotalNumberFound, Count, and HasTimedOut results are always valid. You can use these results with the IF function and Flow Control steps (for example, the Condition step) to ensure that a result exists before executing a TextWriter step. For more information, see the Preventing runtime errors subsection of the Deploying and running your project section in Chapter 2: Building a project.

Generating text using expressions

The TextWriter step is typically used to save information about inspection results. In all but the simplest cases (for example, writing a single result value to each line of a text file), this will require that you to build an expression using the Advanced editor in the configuration pane.

For more information on expressions, see Appendix A: Expression syntax.

Verifying the output of expressions

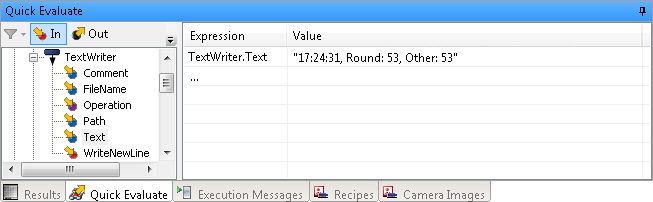
You do not need to deploy and run your project to verify the output of an expression. You can use the Quick Evaluate pane to display the Text property of a TextWriter step:

Formatting numeric results

Be default, numeric results are converted to strings with potentially many digits after the decimal point (for example, 753.38064829). You can specify the formatting of numeric results to improve the readability of results written to logs. Using the Advanced editor, right-click in the expression and select Format. For more information on specifying formatting, see the User-defined date/time and number formats section in Appendix A: Expression syntax.

Converting arrays to strings

You can convert the contents of an array to a string using the ARRAYTOSTRING function. Optionally, you can specify a delimiting character and formatting for numeric results, for example:

ARRAYTOSTRING(Variables.TrendScores, ", ", ":F1")

This expression will return each element of TrendScores, rounded to a single decimal and separated by a comma.

Using control characters

You can include control characters (such as tab and newline) and special characters (such as "{" and "[") using escape sequences. For more information about escape sequences, see the Strings subsection of the Data types section in Appendix A: Expression syntax.

Accessing the date and time

You can include a time stamp in a string using the DATETIME function. This is useful when you need to create log files with names based on the current time, or the GrabTime property of a Camera step.

You can apply formatting to the output of the DATETIME function. For more information, see the User-defined date/time and number formats section in Appendix A: Expression syntax.

When specifying custom formatting for use in a file name, you must not include characters that are illegal in file names (such as "\" and "?").

Writing inspection results to a CSV file

The TextWriter step can be used to generate comma separated value (CSV) files. These files can be opened by most third-party spreadsheet software, as well as many other types of programs. This is particularly useful for saving log files containing inspection results.

If you are writing information from an array or a collection of objects (for example, results for each occurrence found by a BlobAnalysis step), you will need to use ARRAY functions. You can use the SELECT function to extract specific values from each element in the array (for example, only the area of a blob occurrence).

For example, the following expression can be used to write the area and principle axis of all occurrences found by a BlobAnalysis step:

{ARRAYTOSTRING(SELECT(BlobAnalysis.BlobFound,CONCAT(Item.Area, "," , Item.PrincipalAxisAngleBinary, ",")),"\r\n")}

This expression uses the SELECT function to iterate through the array of occurrences and create a string containing the required results from each. The CONCAT function concatenates the Area and PrincipleAxisAngleBinary results, as well as the required commas for use in a CSV file. The ARRAYTOSTRING function converts the array produced by the SELECT function into a single string, with new lines ("\r\n") between each element.

To improve readability, you might want to format a numeric result (for example, rounding it to 1 or 2 decimal places). You can apply formatting to a numeric result using the TOSTRING function. For example, you can round PrincipleAxisAngleBinary to 2 decimal places by modifying the expression above as follows:

{ARRAYTOSTRING(SELECT(BlobAnalysis.BlobFound,CONCAT(Item.Area, "," , TOSTRING(Item.PrincipalAxisAngleBinary,":F2"), ",")),"\r\n")}

You can add column headings by adding the headings and a newline to the beginning of the expression, outside of the evaluate-to-string operator ({}):

Area,PrincipleAngle,\r\n

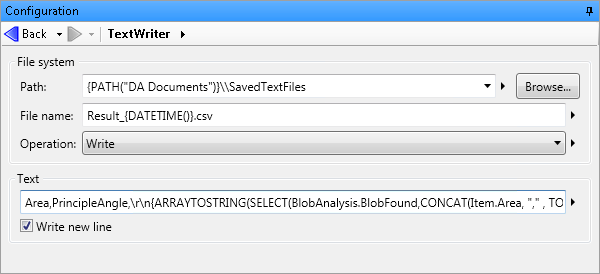
The complete expression to prepare this array for writing to a CSV file is:

Area,PrincipleAngle,\r\n{ARRAYTOSTRING(SELECT(BlobAnalysis.BlobFound,CONCAT(Item.Area, "," , TOSTRING(Item.PrincipalAxisAngleBinary,":F2"), ",")),"\r\n")}

The following settings will write the output of this expression as a CSV file. The file name will be based on the date and time when the file is written.

This TextWriter step might produce the following text file, which can be opened by most third-party spreadsheet software:

Area,PrincipleAngle,
3796,54.20,
3787,76.68,
10607,83.35,

To guarantee compatibility with all third-party spreadsheet software, you should not include commas in results. You should also ensure that each row contains the same number of columns. If a column should be empty, include the appropriate commas with no characters between them (for example, "ColumnA,ColumnB,,ColumnC,").