
Recipes at design-time
Before using recipes in your project, you must indicate which steps, platform configuration settings, and variables you might need to change between recipes, and optionally prepare your operator view for creating and modifying recipes. There are also special considerations you must be aware of when re-deploying a project which utilizes recipes.
 Creating and
deleting recipes
Creating and
deleting recipes
Setting values to be
recipe-dependent
To identify a step as recipe-dependent, right-click on the step and select Persistent per recipe. Steps that are recipe-dependent will have a small R at the bottom-left corner.

The following steps cannot be recipe dependent:
-
Flow control steps, such as the Switch step. If you need to change these steps between recipes, consider using a recipe-dependent variable to control them.
-
The Status step named Status in your main flowchart. If you need to vary some part of this step between recipes, consider using an additional Status step, or recipe-dependent variables.
You must be careful when deleting or renaming steps that are linked to by recipe-dependent steps in a project that has already been deployed. For more information, see the Avoiding broken links in recipe steps section later in this chapter.
To identify a platform configuration setting as
recipe-dependent, click on the alternate options button
![]() to the right of the platform configuration setting in
the
Platform Configuration dialog and select Persistent per recipe. If
this option is greyed-out, the selected setting cannot be
recipe-dependent.
to the right of the platform configuration setting in
the
Platform Configuration dialog and select Persistent per recipe. If
this option is greyed-out, the selected setting cannot be
recipe-dependent.
To identify a variable as recipe-dependent, change its Persist value option to Persistent per recipe in the Manage Variables dialog, accessible from the Flowchart context menu.
Removing
recipe-dependence
Recipe names and
IDs
Each recipe is referenced by a unique ID and name, both of which you can modify from the Recipes pane. These are used when switching recipes at runtime using the LoadRecipe step. Recipe names can also be used to specify unique image sets for each recipe in your project. For more information on having separate image set folders for each recipe, see the Recipe subfolders for image sets subsection of this section.
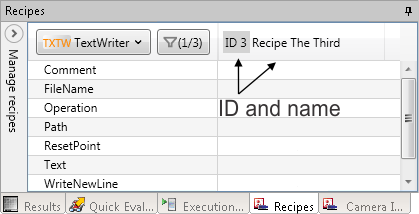
The numeric ID value is useful in cases where you do not want to use a string to reference the recipe (for example, changing recipes from a PLC).
Names are not case sensitive, can be in any language, and cannot contain characters that are used in forming file paths. Your project will be easier to manage if you give recipes meaningful names.
Modifying
recipes
Deploying your
project
All of the recipes in your project that exist on your development computer are listed in the RECIPES tab of the Deploy Project dialog. Only recipes with a checkmark will be deployed to the runtime platform.
Re-deploying a recipe will overwrite the existing values for that recipe on your runtime platform. If you have already made modifications to the recipe at runtime, and you need to keep those changes, you must Import or Synchronize the recipe to your development computer before modifying it and re-deploying. There are additional considerations if steps or variables linked to by recipe dependent steps have been deleted or renamed since the project was first deployed. For more information, see the Avoiding broken links in recipe steps section later in this chapter.
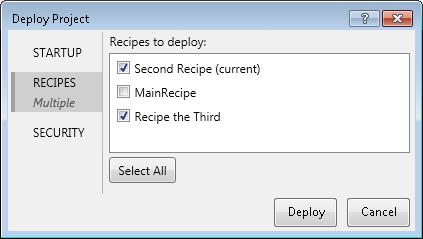
The first time you deploy your project to a runtime platform, all of your project's recipes will be selected for deployment. When re-deploying your project, typically only the current recipe is automatically selected. Deselecting a recipe that already exists on your runtime platform will prevent updates to that recipe from being deployed. The recipe will not be deleted on your runtime platform.
When you start a project on your runtime platform, normally the startup recipe will be the recipe that was open when the project was last properly terminated. Deploying or re-deploying your project resets the startup recipe on the connected runtime platform. Matrox Design Assistant uses the following procedure to determine the new startup recipe:
-
If the current recipe at design-time is selected for deployment, it will be set as the startup recipe.
-
Otherwise, if the existing startup recipe has not been deleted, it will be set as the startup recipe.
-
If no recipe meets the other conditions, the first recipe listed in the RECIPES tab of the Deploy Project dialog selected for deployment will be set as the startup recipe.