Procedure for adding and managing variables
The following procedure provides a basic methodology for adding and using variables:
 Add a variable
To add variables, perform the following:
-
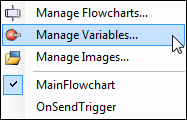
When the Flowchart tab is active, access the Manage Variables dialog using the Flowchart menu or right-clicking inside the Flowchart view, and selecting the Manage Variables... context menu item. You can also access the Manage Variables dialog from the Store step's Configuration pane.
The Manage Variables dialog displays a list of all variables that you have defined in the current flowchart. This list is empty if you have not yet defined any variables.
-
Click the Add... button.
-
Set the variable's Name.
-
Set the variable's Type. Possible types are: Numeric, String, Boolean, Image, Fixture, Timestamp, Numeric array, String array, Boolean array, Image array, Point array, Timestamp array, Object array, or Step. For information on arrays, see Chapter 27: Using arrays. For information on other variables types, see the Data types section in Appendix A: Expression syntax.
-
Set the variable's Reset Point. This specifies if and when the variable is reset to its initial value. By default, Reset Point is set to NeverReset. If you want to reset the variable, you can do so at the beginning of the inspection or flowchart, by setting Reset Point to InspectionStart or FlowchartStart. For more information on a variable's lifetime, see the Lifetime section later in this chapter.
-
Set the variable's Persist property. Possible types are: Do not persist, Persist per recipe, and Persist. For more information about persistence, see the Persistence and the SavePersistentData step section in Chapter 57: Persistence.
-
Set the variable's Initial value. This specifies the value with which to initialize the variable.
Variables are initialized in one of 2 ways, depending on their type. Numeric, Boolean, String, Numeric array, Boolean array, String array, and Point Array type variables can be initialized in the Manage Variables dialog or by using the Store step. Image, Fixture, Timestamp, Image array, Timestamp array, and Object array type variables can only be initialized from the Store step. For more information, see the Set variables with the Store step subsection of this section.
Note that string arrays must be enclosed in the evaluate-to-string operator ({}).
If you choose to add an Object array type variable, you must also choose the Object type before adding the variable to the flowchart. Similarly, you must choose the Object type for a Step-type variable (for example, the IntensityChecker step).
-
Set the variable's description. This description will be displayed in the Configuration pane of the Store step, and also when you select the variable for a SetVariable button in the operator view. Note that the SetVariable button can set variables in subflowcharts, as well as in the main flowchart.
Bind a
variable to the operator view
Set
variables with the Store step
You can use a Store step's Configuration pane at any point in your flowchart to change the values of variables in a flowchart.
Note modifications made to persistent steps by a Store step are only saved when your project terminates correctly, or when a SavePersistentData step is executed.
You can also click on the plus button in this pane to create a new variable. To see this button, ensure that the Add... arrowhead, located at the top-right of the Configuration pane, is pointing right (extended view).
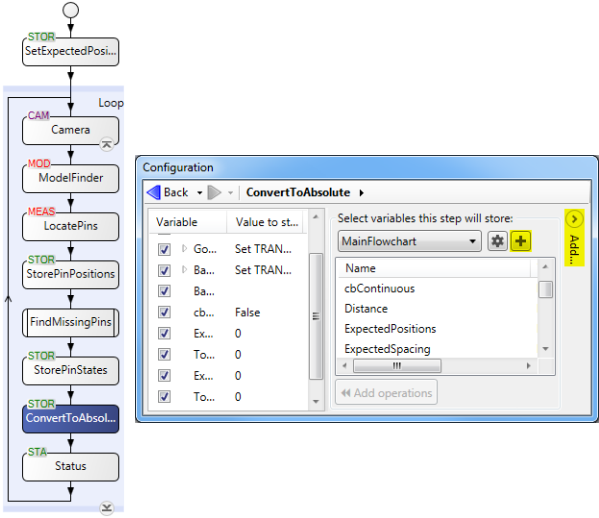
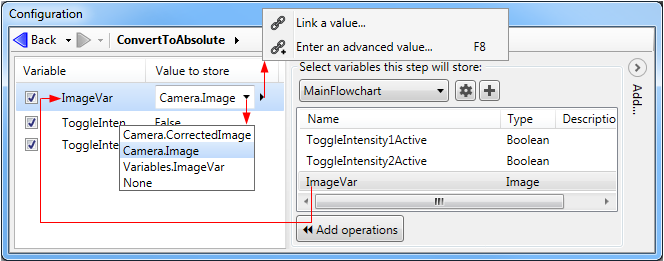
To activate the Manage Variables dialog and edit variables, click on the gear button, which is next to the plus button. Clicking on a variable activates the Add operations button, which allows you to modify the variable directly. You can specify the value to store, either by selecting it from the dropdown list (the options depend on the variable) or by linking to a value. With the Link editor, you can link the variable to the output of a step, and with the Advanced editor you can enter an expression that is evaluated when the Store step is run. The result of the expression is then stored in the variable.
Clicking on the Add... arrowhead, located at the top-right of the pane, will show a collapsed view (arrow head pointing left). At this point, you can click on the related buttons to delete variables, or reorder them, if you have more than one. Variables at the top of the list have a higher priority (they are modified/set first).
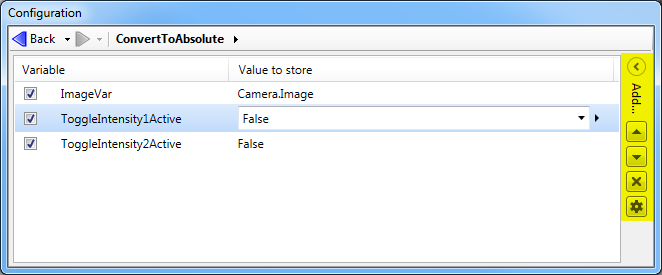
You can also use the Store step's Configuration pane to add and modify array type variables (for example, with array operations). All variables can be enabled (conditionally enabled) or disabled by clicking the checkbox next to the variable name. This indicates whether the variable will be set when the step runs.