
Procedure for using the CodeReader step
The CodeReader step allows you to read several types of 1D, 2D, and composite codes. To read a code, follow the steps below:
-
Select the code type to be read and determine if the code type supports GS1.
-
Optionally, modify the expected angle range.
-
Optionally, modify the threshold setting with regards to lighting.
-
Optionally, modify the distortion correction method.
-
Optionally, specify a search region.
-
Optionally, fine-tune your read.
-
Optionally, specify input code type specific information.
If you are having difficulties reading a code after following these steps, see the points listed in the Hints subsection of this section.
 Select the
code type to be read
Select the
code type to be read
To select a Code type to be read, do the following:
-
Run the project to the CodeReader step.
-
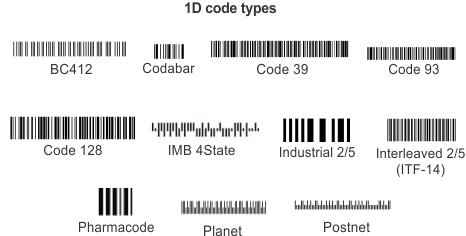
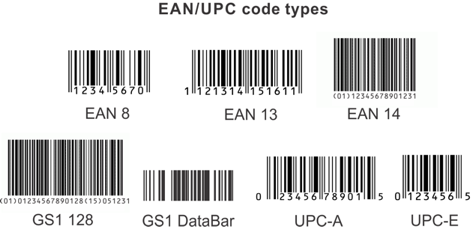
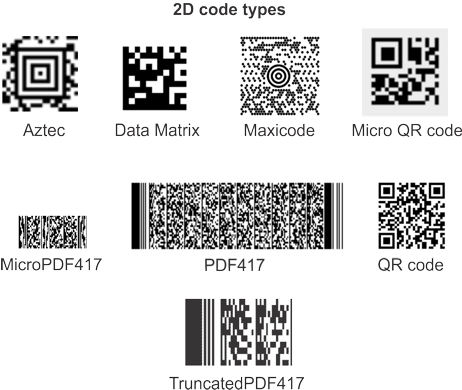
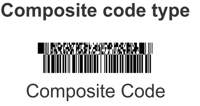
In the Configuration pane, choose the code type to read by clicking on View All CodeTypes... and selecting the image of the code type, or choose the appropriate code type from the dropdown list. Matrox Design Assistant supports 1D (including EAN/UPC), 2D, and composite code types.
-
Specify the Foreground color of the code to be read in the Configuration pane.
To help achieve a successful code read, make sure that the thinnest bar or cell in the code is at least 2 pixels wide.
Code types
that support GS1
Modify the
expected angle range
Modify the
threshold setting with regards to lighting
During a read operation, the Threshold Mode is used to binarize the entire image, separating the code from the background. By default, the Threshold Mode is set to Adaptive. If a different thresholding value would result in a better separation (and therefore in a more efficient operation), you can change the Threshold Mode to GlobalSegmentation, GlobalWithLocalResegmentation, or you can link a value.
To specify a Threshold setting, do the following:
-
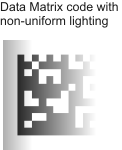
In the Configuration pane, you can set the Threshold Mode. Setting the Threshold Mode to Adaptive computes a threshold value for each pixel based on the range of intensity values in its neighborhood. Adaptive is best suited for codes with non-uniform lighting.
Setting the Threshold Mode to GlobalSegmentation sets a global threshold value. Setting the Threshold Mode to GlobalWithLocalResegmentation specifies that the source image will be globally thresholded, and then the edges in the image will be resegmented based on the intensities of the surrounding bars and spaces in the original image.
-
If you are reading 1D codes and the Threshold Mode is set to Adaptive, you can specify the Minimum contrast (the default is 50) between the foreground and background. Valid values for the minimum contrast are between 1 and 255.
-
If the Threshold Mode is set to either GlobalSegmentation or GlobalWithLocalResegmentation, the ImageThresholdValue can be set. The default value is set to Auto, in which case Matrox Design Assistant automatically selects a threshold value to use.
Modify the distortion
correction method
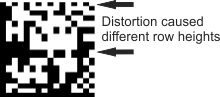
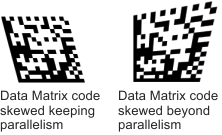
If an Aztec, Data Matrix, or QR code is distorted, it might not be read during a read operation. In this case, you can apply a distortion compensation algorithm that increases the robustness of the read operation. There are 2 different options for the Distortion correction property that you can use, depending on the code type and the type of distortion present in your image.
If the code has different column widths or row heights, you can select the UnevenGrid option. This option is the default for Aztec and QR code. It can also work in the presence of small perspective distortion.
For a Data Matrix code with large perspective distortion, the default setting is Perspective. This option can compensate for codes that are skewed though maintain parallelism and those that are skewed beyond parallelism.
Specify the
search region
It might be necessary to specify the Search Region if there are multiple codes of the same type in the image, or if there is a lot of interference from objects in the background.
To set the search region interactively, select the CodeReader step in the
flowchart and use the
Define a region ( ) toolbar button in the
Project toolbar. See the
Search regions section in
Chapter 2: Building a project for more information.
) toolbar button in the
Project toolbar. See the
Search regions section in
Chapter 2: Building a project for more information.
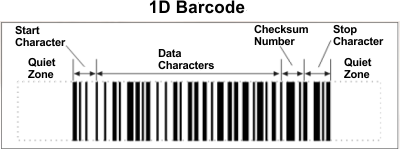
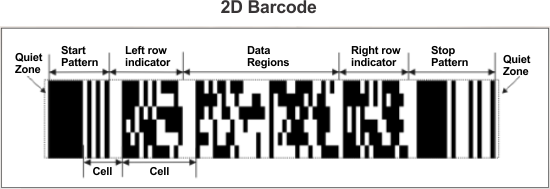
When specifying the search region, it is important to leave a quiet zone around the code. The quiet zone is an area around the code with no markings in it. For 1D codes, the quiet zone immediately precedes the start character and immediately follows the stop character, whereas for 2D codes, the quiet zone must be present on all 4 sides of the code. The quiet zone must be large enough to meet the code type specifications; for example, the Data Matrix code type requires that the quiet zone be at least 1 cell wide, while 1D code types require a quiet zone of 2 to 10 times the width of the thinnest bar, depending on the type.
If you are reading Data Matrix codes, it is preferable to enable Presearch instead of specifying a search region. The presearch operation allows Matrox Design Assistant to locate 2D codes in the image prior to the read operation.
If the search region is too small and the quiet zone is not sufficient, or if there are markings in the quiet zone, you can set CheckQuietZone to Disable to help achieve a successful code read.
Fine-tuning your
read
To improve your read, provide the CodeReader step with additional specifications.
If you are reading 1D codes:
-
You can adjust ScanlineHeight and ScanlineStep properties to manually control the sampling of a 1D code. The scanline height is the thickness of the scanline across which the code information is read. Increasing this value will lead to a slower but more accurate code read. The scanline step is the gap between scanlines; increasing the scanline step will lead to a faster code read.
-
You can adjust the Speed property to control the speed of the scan. The scanline height and the scanline step will be internally adjusted according to the change in speed. If you are having problems finding the code, you might want to search at a speed lower than the default.
If you are reading 2D codes:
-
Click on the Target Grid... button. The TargetGrid tab is presented.
-
To increase the robustness of your read, set NumberOfCellsX and NumberOfCellsY to appropriate values.
-
If you are reading Data Matrix or Maxicode types, you can set the values of MinimumCellSize and MaximumCellSize to make the operation more robust.
-
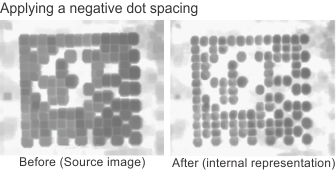
If the cells are dots (dot peen) instead of squares, set DotSpacing to half the distance, in pixels, between dot edges.

If the dots overlap and/or when the dots have extended into the surrounding spaces, you can set a negative dot spacing. For example, in the image below, since the dots are too close together, specifying a negative dot spacing will shrink the dots, which might result in better results. The image on the right shows how Matrox Design Assistant interprets the image after applying negative dot spacing.
In certain cases, a read might take longer than expected. If this happens, you can set the Timeout property to a maximum time for the read operation. By default, the Timeout value is set to 2000 milliseconds.
If the edges of the cells or bars are fuzzy and you cannot improve the focus, try using an image processing filter such as sharpen, sharpen 2, Deriche sharpen, or Shen sharpen. For more information on image processing filters, see the Filtering subsection of the ImageProcessing step operations section in Chapter 9: ImageProcessing step.
Code type
specific information
Hints
Initialization
mode
Results
The most commonly accessed results are Decoded String and Status. To fine-tune the read operation, the Number of cells and Cell size results can also be useful.
The CodeReader position result can be used as a Fixture provider. For 2D codes, the position is the center of the first corner cell. For 1D codes, the position will be somewhere along the first bar. If it is necessary to force the position to the top of the first bar, you can set the PositionAccuracy to High in the Properties pane.

In the Quick Watch flyout panel, the Angle, DecodedString, Position, and Status results are displayed by default.
In the Annotations control panel, the Search region, Decoded string, Position, Box, and Output coordinates are selected for display by default. You can click on the filter button to show the advanced annotations Code, Quiet Zone, and Absolute coordinates. For more information on annotations, see the Displays section in Chapter 50: Customizing the operator view.