Annotations
 Previous
- Next

By default, steps with result annotations display them based on the current annotation settings. Changing a setting immediately updates the annotations of the selected step's displayed image. To modify whether annotations are hidden or how they are displayed, use the Annotations control panel (if this panel is hidden, click on the Annotations toolbar button in the Project toolbar). Changing a setting immediately updates the annotations of the selected step's displayed image.
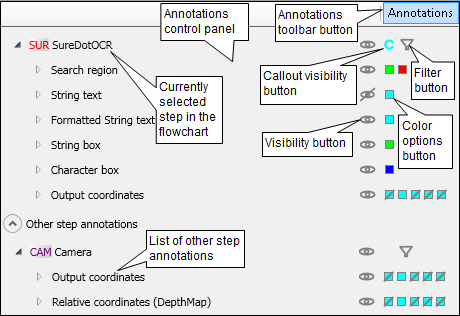
Clicking on the arrowhead to the left of a step's name in the Annotations control panel displays a list of all the available annotations, such as position. Hovering on an annotation in this list will activate it on the selected step's displayed image. To also show annotations from other steps, select them from the Other step annotations list. Your project must be paused before you can add annotations to the selected step's displayed image.
Use the following buttons to modify the annotation settings.
|
Button |
Description |
|
Filter button |
Filters the list of available annotations. By default, the key annotations for the selected step are listed. Click on this button to view all the available annotations for the selected step; it will have a line through it, indicating that filtering has been disabled. |
|
Visibility button |
Specifies whether or not to display a specific annotation on the step's displayed image. A line through this button indicates that the associated annotation has been disabled on the displayed image. To disable the display of all annotations for a specific step, click on the Visibility button to the right of the step name. |
|
Callout visibility button |
Specifies whether callouts are always visible or hidden. When displaying annotations from other steps, their callouts will typically appear only when the cursor hovers over these annotations. You can set how to display callouts for a specific step by clicking on the Callout visibility button to the right of the step name. The typical default behavior is to only display the annotations of the currently selected step. The Status step displays all the callout annotations for every step. For more information, see the Using the Quick Watch flyout panel and callout annotations section later in this chapter. |
|
Color options button |
Assigns colors to different states of the annotation. Each annotation has one or more color options to the right of its visibility button. By default, an annotation appears green for a successful operation, and red for a failed operation. For example, when locating measurement markers, the annotation appears green when a marker is found, and red when a marker is not found. If an annotation does not automatically indicate pass or fail with green or red, or if you want to customize the color options, see the Setting annotation color subsection of the Displays section in Chapter 50: Customizing the operator view. |
Note that annotations that you choose for design-time are independent of the runtime ones. To add runtime annotations, see the Displays section in Chapter 50: Customizing the operator view.