
Accessing camera depth map results
 Previous
- Next

You can access various depth map results from the Camera step, including the depth map at different available bit depths.
The following image shows the Quick Evaluate pane and the available Camera step outputs for a depth map. Double-click on an output to see its current value.
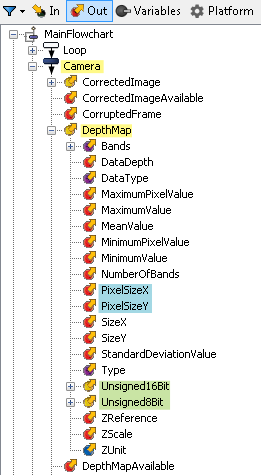
Note that the Unsigned8Bit and Unsigned16Bit output images are available only if remapping is enabled for the depth map (see the Remapping subsection of the Procedure for using a depth map section earlier in this chapter). When remapping is enabled, you can link directly to these images, or you can select the DepthMap output image, which provides the version with the deepest suitable bit depth for the step that links to the Camera step. If remapping is disabled, the DepthMap image is an unremapped version with a bit depth and data type provided by the 3D sensor. This version is usually not an image that can be used by processing and analysis steps.
The PixelSizeX and PixelSizeY outputs indicate the average world units per pixel. For uncalibrated images, the value returned is 1.
 Calculating
volume
Calculating
volume
You can calculate approximate volumes from a depth map, using the SumOfPixels output of the BlobAnalysis step. The SumofPixels output returns the sum of all pixel values in a blob. For a depth map, multiplying this value by the X and Y pixel sizes gives the volume of the designated depth map blob. Note that, for a correct volume calculation, the reference position for depth values must be a plane directly beneath the object(s).
Note that the depth map must be calibrated in X, Y, and Z.
To calculate the volume, apply the following:
-
Ensure that depth values are relative to the ground plane of the scene, where Z = 0.
-
Add a BlobAnalysis step to your project.
-
Adjust the settings in the BlobAnalysis step's Configuration pane to identify the required depth map blob(s). Set the Image input to Camera.DepthMap and, on the Advanced settings page, set the Gray image mode input to SourceImage. For more information, see the Gray image modes subsection of the BlobAnalysis step advanced settings section in Chapter 3: BlobAnalysis step.
-
Add SumOfPixels to the Features section of the BlobAnalysis step's Configuration pane.
-
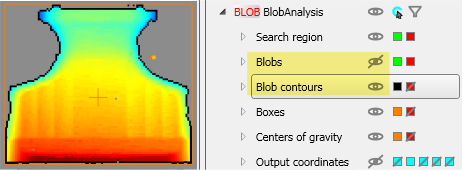
Optionally, adjust the display to view the depth map and blobs concurrently. To do so, select the BlobAnalysis step, and then right-click on the step's display view, and choose BlobAnalysis.Image from the Display Image dropdown list. Then, in the Annotations control panel, make Blob contours visible, while turning off the visibility of Blobs. This displays blobs in outline form on the depth map. Adjust the color of Blob contours if necessary.
-
Add a Store step and set a variable to the result of the following expression, which calculates the volume of the specified blob:
BlobAnalysis.BlobFound(1).SumOfPixels*Camera.DepthMap.PixelSizeX*Camera.DepthMap.PixelSizeY
When entering the expression in the Store step, note that you can drag and drop the BlobAnalysis.BlobFound(1).SumOfPixels result from the blob occurrence's Quick Watch flyout panel. Similarly, you can drag and drop the Camera.DepthMap.PixelSizeX and Camera.DepthMap.PixelSizeY expressions from the Quick Evaluate pane. Drop results and expressions into the designated Store step variable's Value to store input box, while building the full expression.

For information on the Store step, see the Set variables with the Store step subsection of the Procedure for adding and managing variables section in Chapter 25: Variables and the Store step.
For an example of calculating a 3D volume from a depth map, see the Volume from depth map and defect detection example project.