
Procedure for using the SureDotOCR step
The following procedure provides a basic methodology for using the SureDotOCR step.
-
Adjust the overall read settings to control the general processing of all strings to read.
-
Optionally, define spaces.
-
Optionally, define intensity and contrast.
-
Optionally, rename strings and models to have meaningful names.
-
Run the project to the SureDotOCR step to ensure your project works as you expect.
If images are calibrated, specify positions and dimensions in world values; otherwise, use pixel values.
If necessary, you can fixture the SureDotOCR step's search region. This can be useful to improve read results, particularly with cluttered images and when the strings to read move at runtime. For more information, refer to Chapter 32: Fixturing.
 Adjust
the overall read settings
Adjust
the overall read settings
Overall read settings control the SureDotOCR step's algorithms and affect the general processing of all strings to read. To adjust the overall read settings, perform the following from the Configuration pane:
-
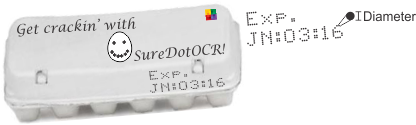
Set the Dot Diameter. This refers to the size of the dots that make up the characters to read in the image. The minimum size is 4 pixels.
You can use the Trace a line profile (
 )
toolbar button in the
Project toolbar to accurately measure a dot.
)
toolbar button in the
Project toolbar to accurately measure a dot.The dots that make up the characters in the image must be visually distinguishable, both vertically and horizontally. If dots are merged into a solid bar, as seen in the following image, there can be difficulties reading.
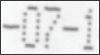
When dots are merged (that is, you cannot perceive the bump of each dot) due to low resolution or poor focus, improve the image's quality. If a string's dots are printed such that their center to center spacing is less than the dot diameter, it might not be feasible to read such strings reliably.
-
Click on the Define string box... button in the Configuration pane, or the Define string box (
 ) toolbar button to set the Width and Height of the string box.
This box encloses all the characters of all the strings to read in
an image. Width refers to the direction along a line of characters.
Height is perpendicular to width.
) toolbar button to set the Width and Height of the string box.
This box encloses all the characters of all the strings to read in
an image. Width refers to the direction along a line of characters.
Height is perpendicular to width.
-
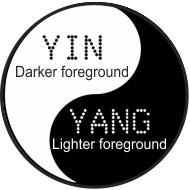
Optionally, set the Foreground. This refers to whether the dots that represent the characters of the strings to read are darker or lighter than the background. The default assumes characters are darker than the background; for example, black dots on a white surface.
-
Optionally, set the Space Size Max. This specifies the maximum gap allowed within a string. The default is 3 times the widest character. If the string has a gap that is greater than the maximum space, there is a break in the string. To read the individual parts of the string, you need multiple string models. For more information, refer to the Define spaces subsection of this section.
-
Optionally, click on the Search region... button in the Configuration pane, or the Define a region (
 ) toolbar button to define the area within the
image that the SureDotOCR step uses to
perform its calculations. Each SureDotOCR step has one
search region; the default is the entire image. For more
information, see the
Search regions section in
Chapter 2: Building a project.
) toolbar button to define the area within the
image that the SureDotOCR step uses to
perform its calculations. Each SureDotOCR step has one
search region; the default is the entire image. For more
information, see the
Search regions section in
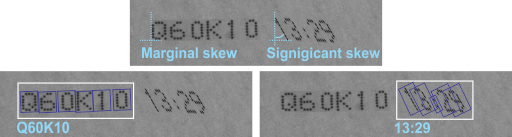
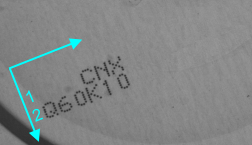
Chapter 2: Building a project.Multiple strings in an image can sometimes have characters with dissimilar qualities, such as variations in skew angle or spacing between dots. This can occur when, for example, the strings were printed with different ink jets. To prevent inaccurately reading such strings, you can use separate search regions. The following strings require 2 search regions (which requires 2 SureDotOCR steps) to properly read characters with 2 different skew angles.
-
Optionally, click on the Angle... button in the Configuration pane to define the nominal angle at which to read the string. By default, the SureDotOCR step automatically establishes the overall angle of the string. However, you can increase inspection speed if you specify the angle and fixture the project. To specify how the angle is established, set StringAngleMode to one of the following:
-
Auto or Default. These are interchangeable and will calculate the string angle automatically.
-
Angle. Specifies to use the StringAngle input as the angle, and that the string will be read from left to right with the characters facing up. If the StringAngle input is set to Default, the angle will be 0 degrees.
-
Orientation. Specifies to use the StringAngle input as the angle; in this case, the strings will be read either left to right with the characters facing up, or right to left with the characters facing down. This is useful in cases where the orientation of a string is rotated 180 degrees, and this rotation does not affect the acceptability of a product (for example, if a product is placed backwards at an inspection point but is still a good part). If the StringAngle input is set to Default, the angle will be 0 degrees.
-
AccordingToRegion. Specifies the string angle to be 0 degrees, relative to the angle of the ROI provided in the target image.
-
-
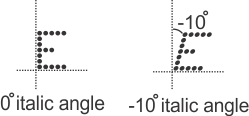
Optionally, from the same Angle page in the Configuration pane, you can define the overall italic angle (skew) at which to read all characters in the strings. By default, the SureDotOCR step automatically establishes the overall italic angle of the characters in all the strings. However, you can increase inspection speed if you specify the italic angle and the project is fixtured. To do this, set ItalicAngleMode to Angle and then set the ItalicAngle input to the angle. For ItalicAngleMode to be an available option, StringAngleMode cannot be set to Auto (or Default).
The valid range for ItalicAngle is -90 to 90 degrees, relative to a line perpendicular to the angle of the string. For ItalicAngle, the Y-axis is the zero reference (instead of the X-axis), and a positive angle searches for the characters leaning counter-clockwise at the specified angle (left-leaning); whereas, a negative angle searches for the characters leaning clockwise at the specified angle (right-leaning). If ItalicAngle is set to Default, the angle will be 0 degrees.
Define fonts
A font is a container that holds a list of characters, with each character's dot-matrix representation and name. The following font has 5 characters represented with a 5x7 dot-matrix. The characters are named "1", "2", "3", "4", and "5". This font is considered a 5x7 font since the dot-matrix of all characters in a font must have the same number of rows and columns.
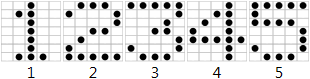
A SureDotOCR step must contain one or more fonts. A font must contain one or more characters. Only strings with characters accurately represented by a font can be read. For example, to read the number "5" in an image, the number "5" must be a character in the specified font. If the number "5" in the image is represented with a 5x7 dot-matrix, the font must be 5x7. If the number "5" in the image is 7x9, the font must be 7x9. If all the characters in all the strings will be in italic (skewed), you should not add the italic version of the characters to the font. Instead, set the italic angle (skew) as described in the previous subsection.
To define fonts, perform the following from the SureDotOCR step's Configuration pane:
-
Click on the Add button to add a new font to the step. From the presented options, either:.
-
Select a font from the predefined list. The dot-matrix dimensions of the font's characters must be identical to those in the strings to read.
-
Click on the Import from file... button to add a font from a MIL SureDotOCR font file. This is essentially a customized text file with the MIL SureDotOCR font file extension, MDMRF. Fonts can be imported from, or exported to, another Matrox Design Assistant project (or MIL SureDotOCR context). For more information, see the Fonts section later in this chapter.
-
-
Click on the Rename button to rename a font, or click on the Delete button to delete a font. Font names should be intuitive. Deleting fonts removes them from the Fonts page in the Configuration pane. You can re-add them at any time.
-
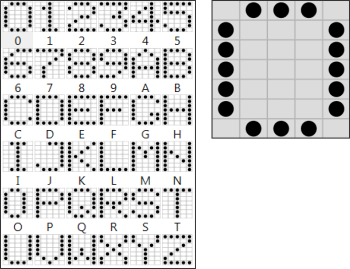
Click on the Edit button to edit a font. This opens the Fonts page of the Configuration pane, which displays a thumbnail view of all characters in the font and a dot-matrix grid. The first thumbnail character is automatically selected, but you can click on any thumbnail to view that character's dot-matrix.
On the Fonts page, you can do the following:
-
To add a missing character, click on the Add button. For each character added, enter its name (ASCII or Unicode), and define its dots in the dot-matrix grid. Clicking an empty cell adds a dot; clicking a cell with a dot removes it. When you add a character the grid is initially modifiable (white), and once you click on the Apply button it becomes non modifiable (gray).
-
To edit a character, select the thumbnail of the character, and click on the Edit button. Click in the grid to add and remove dots. You cannot specify spaces in a font; instead, you must use the space settings to deal with spaces (gaps) within strings.
The dot-matrix of each character in a font should be, dot for dot, the same as the dot-matrix of each character in the string to read. Discrepancies can adversely affect how strings are read. Be aware that, just because characters have the same dot-matrix dimension, the distribution of dots that represent them are not necessarily the same. For example, each of the following fonts has 5x7 characters; if you compare the dot-matrix of their characters, you can spot several differences.

-
To delete a character, select the thumbnail of a character, and click on the Delete button. Fonts should only contain the characters to read; make sure to delete all unneeded characters.
-
To export a font, click on the Export button. This will export the selected font to a MIL SureDotOCR font file (.mdmrf file).
-
Define strings to
read
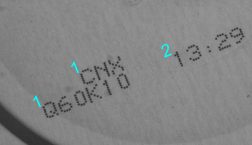
A SureDotOCR step allows you to read, at any angle, one or more rows of dot-matrix characters in the Search region (the default is the whole image). Each of these rows is considered to have at least one "string to read". If you want to read multiple rows of text, you must add multiple strings to read in the SureDotOCR step's Configuration pane. The following image has 2 strings to read. Strings are read top-down and left-to-right, according to the angle at which they are located.
Each string to read requires at least one string model. A string model defines the length and content of the expected text. For example, you can specify that at a certain position, a specific character from a specific font must be read.
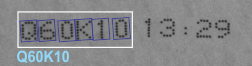
If the text in a row has large spaces, dividing it into separate groups of text, you should either permit a space that large in the string model(s) at the required location, or add these 2 groups as 2 separate string to read, with at least one string model for each string to read. For example, the text in the following image can be treated as 2 or 3 strings to read. The first row has 1 string to read; the second has 1 or 2.
Regardless of the number of string models, only one string is read and returned as a result for every specified string to read. The string that is read corresponds to the one that best matches the string model (that is, the one with the highest score).
To define the strings to read, and their string models, perform the following from the Strings to read area in the Configuration pane:
-
Specify the correct number of strings to read. This number must be at least the same as the number of rows of text to read in the image. By default, there is 1 string to read. Click on the Add String to Read button if you need more.
The order in which you list the strings to read must match the top-down and left-to-right order in which the strings are read in the image. If a string to read is improperly ranked in the list, move it up or down by selecting it and pressing the arrow heads next to the Strings to read area.
-
Add the correct number of string models for each string to read. By default, each string to read has 1 string model. If a string to read requires more, select it, and click on the Add String Model button. Multiple string models are needed if you want to specify different possible sets of constraints for the string (for example, if the string to read must have LowerCase for the first 3 characters, followed by Digits for the next 3 characters, you would need to constrain the strings to read with 2 string models).
-
Select the first string model and click on the Edit button (or double-click). The StringModel tab opens. Set the Max String Size. This specifies the expected number of characters to read for the string model.
Perform this step, and subsequent steps, for every string model, using that model's StringModel tab.
-
Set the String Acceptance, Character Acceptance, and String Certainty. These settings are thresholds on string and character scores. Such scores quantify, as a percentage, how closely the string that you want to read resembles the string in the image. Essentially, these settings let you regulate when a string is good enough to read.
String Acceptance sets the lowest possible average score of all the characters in the string. Character Acceptance sets the lowest possible score for each individual character in the string. The default for each is 50. The String Certainty sets the score at which the SureDotOCR step is certain the string should be read and stops looking for other possible candidates. Only use certainty to optimize read speed. Its value should be significantly higher than acceptance. The default is 70. For more information, refer to the Acceptance and certainty subsection of this section.
-
Set the constraints of the string model and its characters. For constraints of the string model, use the Constraints area. For character constraints, use the Character Constraints button.
The constraints of the string model define its basic rules. They indicate the Type of characters to read (for example, Digits) and the Font that represents them (for example, DOT_FONT_DOMINO). The defaults allow you to read any character from any font.
The Character Constraints define specific rules (Type and Font) for one or more individual character positions in the string model. If you define them, they override the constraints of the string model at the specified positions. For example, if you have a string to read that is composed of all digit characters except for the first, which is a letter, you can set the Type constraint of the string model to Digits, and you can add a character constraint indicating that the Type of character to read at position 1 must be Letters.
If you set the Type of either the string model or its individual character positions to CharList, a text box appears in which you can specify specific characters to read (except for space), such as "RaiseTheBarWithSureDotOCR!".
One of the Type settings is Space. This is a special constraint that typically refers to a blank area, but can also refer to some marking (such as an icon) that you want to ignore. As with all other constraints, you must enter the position at which the space (the marking to ignore) appears. If the string has spaces but you are not explicitly reading them with the space constraint (which is typically the case), the spaces do not count as character positions in the string. The space constraint should be used rarely; it is not how to typically manage spaces.
Reading partial
strings
If you are only interested in part of a string, you should still read all of the characters in the search region, even the ones you don't want. This helps avoid problematic results. After reading the entire string, use string related functions, such as SUBSTRING, to extract the required portion.

Alternatively, you can modify the search region to only contain the part of the string you are targeting.
Define spaces
Space generally refers to gaps between characters. To deal with spaces in strings, the SureDotOCR step lets you set a maximum (Space Size Max) and minimum (Space Size Min) spacing.
If a string to read has a gap that is greater than the maximum spacing, the gap separates the text into separate strings to read and must be defined as such; otherwise, only one part will be read. If a string to read has a gap that is less than the maximum spacing, but greater than the minimum spacing, that gap is considered a space between characters within the string model. If the gap is less than the minimum spacing, the SureDotOCR step does not recognize a space.
To specify space settings, perform the following:
-
Set Space Size Max from the Configuration pane. The default is equal to 3 times the widest character in the string.
-
Set Space Size Min from the Properties pane. The default is equal to the widest character in the string.
Although rarely done, you can disable the maximum and minimum spacing requirements by setting SpaceSizeMaxMode and SpaceSizeMinMode to Disabled from the Properties pane. Disabling the maximum spacing results in always considering characters aligned in the same row as part of one string model, even if there are large gaps. Disabling the minimum spacing results in no space detection.
Space
constraint
The Space constraint generally implies that you want to explicitly read a space at a particular position in a string. Since the SureDotOCR step attempts to read the best string possible, it actually uses the Space constraint as an area to ignore, even if that area is not empty. For example, a string might be read if you have an icon at a position identified with the Space constraint.
|
String |
Character constraints |
Will it read? |
|
M |
LSL |
Yes |
|
M |
LSL |
Yes |
|
The character constraints 'L' and 'S' refer to Letters and Space, respectively. |
||


Unlike other character constraints, you cannot have a Space constraint at the first or last position in a string model, nor can you have consecutive positions with a Space constraint. If a space was successfully read with a Space constraint, its resulting character score will be 100%. The SureDotOCR step does not use such scores when calculating the string score.
Intensity and
contrast
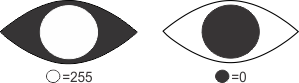
Intensity refers to the average grayscale value of the pixels that make up the character's dots in the strings to read. Since images must be 8-bit, the highest possible intensity of a dot is 255 (white). The lowest possible intensity is 0 (black).
Contrast refers to the difference in pixel intensity between a character and its background. The greater the difference, the higher the contrast. The following dot-matrix strings, from left to right, show a decrease in contrast.

If a valid character exists in the image, it can typically be read with the default intensity and contrast settings. However, if results are proving problematic, or you want to try and speed up the read time, you can adjust these settings.
To specify intensity and contrast settings, perform the following from the Properties pane:
-
Set MaxIntensityMode or MinIntensityMode to UserDefined.
-
Set MaxIntensity or MinIntensity. Valid values are between 0 and 255, inclusive. The default minimum is 0; the default maximum is 255.
-
Set MinContrastMode to UserDefined.
-
Set MinContrast. Valid values are between 0 and 255, inclusive. The default value is 15.
The SureDotOCR step ignores potential character data in the image that does not have an intensity that falls within the specified minimum and maximum range or that does not have a contrast greater than or equal to the specified minimum value. Although this can be useful to fine-tune your results and potentially decrease read time, particularly if the image background is noisy but the dots are strongly contrasted, be aware that improperly ignoring image data can cause the SureDotOCR step to ignore actual characters.