
Procedure for using the PatternMatching step
The following provides a basic methodology for using the PatternMatching step:
-
Load or grab a model source image.
-
Define the model from the model source image.
-
Define a search region from the model source image.
-
Optionally, specify a range for angular search.
Matrox Design Assistant provides several parameters you can adjust to get the required result. For each individual model, you can:
-
Set the expected Number of occurrences of the model.
-
Specify the minimum Acceptance score required to count the candidate model as a match. The Acceptance is set as a percentage, where a perfect match is 100 and no correlation is 0. You should experiment to decide what a typical match score is for your application.
 Load or
grab a model source image
Load or
grab a model source image
Define the model
The model source will be used to search for occurrences of a pattern in an image. As such, the model should be unique and not defined from a flat region where all pixel values are consistent with no edges. Additionally, the model source image should be of the best quality possible.
There are 2 types of models.
-
Normalized.
-
Circular Overscan.
Normalized models are the recommended model type and are used when almost no rotation is expected. You can also specify a discrete set of rotations, for example, every 90 degrees. For full rotational search use the ModelFinder step.
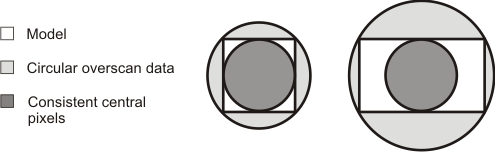
A circular overscan model is only suitable for very small models if the border of pixels around the model is the same in the model source image and in the target image. When a circular overscan model is created, a set of models is extracted from rotated versions of the model. For this reason a circular overscan model cannot be created closer than 20% of its width from the edge of the model source image. Circular overscan models tradeoff very high memory usage against faster search at angles.
When creating a model using circular overscan, the overscan data outside the Model ROI is also extracted from the source image. When extracting a model, it should not be extracted from a region too close to the edge of its source image. This will generate an error because the circular overscan data extends beyond the boundaries of the image. More information can be found in the Reconfigure step overview section in Chapter 56: Reconfigure step for additional limitations.
A model can be defined in 2 ways: you can interactively define an area of the model source image to use as your model, or you can automatically add a unique model.
To interactively define a model, perform the following:
-
Click on the Add image model (
 )
toolbar button in the
Project toolbar and choose to add a normalized model, or a
circular overscan model.
)
toolbar button in the
Project toolbar and choose to add a normalized model, or a
circular overscan model. -
In the Display view, define your area by specifying a rectangle with by clicking and dragging. You can cancel defining by pressing the Escape key.
-
The defined model is shown in the Configuration pane. You can Edit, Rename, or Delete this model.
You can also automatically define a model. This will search for the specified number of most-suitable unique areas and of the specified dimensions, in the model's source image. This can be used when there are no significant differences between the source and target images. For each area found, a model is automatically added. Perform the following to add an automatic model:
-
Click on Add auto model(s) in the Configuration pane.
-
Specify the Number of models to search and the Model type.
-
You can set the Allocation mode to Fast or Best. Best will allocate the models with high precision while Fast will allocate the models at high-speed.
-
Use Fast if your model source image is large and Best if it is small.
-
Size X and Size Y define the width and height of the models.
-
Position uncertainty X and Position uncertainty Y will select models that are far enough from the image borders to be present in the target images in the horizontal and vertical direction respectively.
-
By default, models will be searched in the whole image.
-
In certain circumstances, models can be searched at angles. For more information, see the PatternMatching step advanced settings section later in this chapter.