Displaying a step's images
You can choose to view one or more images at a time from the display view. When viewing one image for a selected step, you can choose an image from a number of options. You can also select an image for a step that does not take an input image of its own. A step can only display an image after it is run. For more information on running and executing flowchart steps, see the Selecting and running a step section in the Flowchart view reference chapter.
 Steps with
optional images
Steps with
optional images
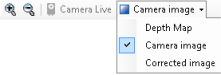
Some steps accept an optional additional input image (for example, the BlobAnalysis step) and some generate an optional output image (for example, the Camera step and the BlobAnalysis step). To switch between the various images associated with a step, right-click the display view to access the context menu; then, select Display Image and choose the output image. Alternatively, you can choose an image from the View Display Image menu item. You can also click on the Camera step image toolbar button in the Project toolbar to choose which image to display from a dropdown list.