
TimeStamp step overview
 Previous
- Next

The TimeStamp step allows you to benchmark the performance of your project, get the timestamp at different points in your flowchart, or provide a timing reference for other steps.
The step does not contain any properties to edit like other steps in Matrox Design Assistant. Instead, you link or use its time property in variables or expressions.
 Perform a
benchmark
Perform a
benchmark
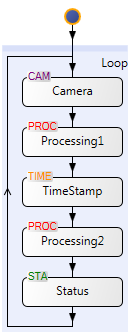
There are 2 predefined timestamps that can be used for benchmarks: the Camera.Time value of the Camera step and the Status.Time value of the Status step. These values are used for the analysis time benchmark visible in operator view. In addition you can have a TimeStamp step to perform benchmarks for various points in your project.
For example, if your project has 2 stages of processing, and you want a benchmark for each stage of processing, you can add a TimeStamp step between each stage of processing to determine the time each stage took.
To output each benchmark time from the above example to the operator view, enter each of the following codes in an output value box in the operator view:
Status.Time-TimeStamp.Time
You can save a timestamp to a Timestamp or Timestamp array variable. When using a Timestamp array variable you can keep the last 100 timestamps or elapsed times at a particular point in the loop. You can then determine statistics for the timestamps.
Note that the loop from the Status step back to the Camera step has an effect on overall execution time. This is due to operator view publishing time and can be very significant if the analysis time is very short and grab time is done in parallel.
For more detailed analysis of all steps and operator view publishing activities, use the Matrox Profiler tool. For more information on using the Matrox Profiler tool, see the Profiling and troubleshooting logs section in Chapter 59: Optimizing your runtime projects.