Procedure for using the WhiteBalance step
 Previous
- Next

The WhiteBalance step uses WhiteBalance coefficients to produce the final color-corrected image.
The step calculates 3 white balancing coefficients a, b, and c. These coefficients are for a given lighting condition and calculated such that, given an image of a flat gray surface in that lighting:
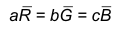
where R, G, and B in this equation are the average values of the image's red, green, and blue color components, respectively. When grabbed images are converted, the intermediate color components of each pixel are multiplied by their corresponding coefficient. Typical coefficient values are between .7 and 1.4.
Note that when using values greater than 1, bright pixels might become saturated.
If, in any given lighting environment, the camera captures a light gray image with the following histogram:
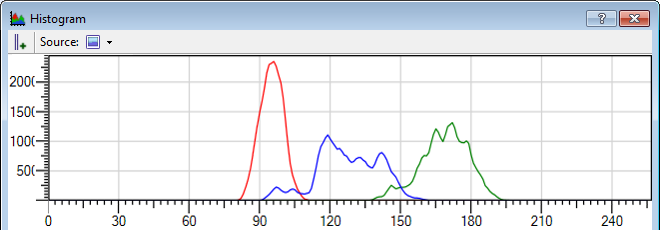
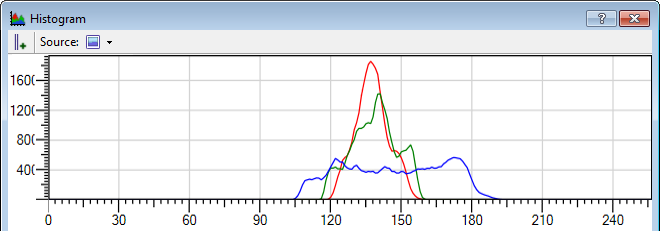
the image will appear too green. The white balance coefficients can be used to scale the blue and green components down to the level of the red component or to scale the red and blue up to the green level:
The WhiteBalance Coefficients property in the Configuration pane can be calculated from the grabbed image using Calculate, or set from predefined values using either the Default or Custom option. The procedure for creating and saving white balance settings with the WhiteBalance step is similar to the portal website.
When setting the WhiteBalance Coefficient property to Calculate, the WhiteBalance step grabs an image and calculates the settings needed to produce balanced grays and white, then applies these settings to the current project. In most instances, it is preferable to use the DEFINE WHITE BALANCE tab of the TOOLS portal page to create and save white balance settings. However, the WhiteBalance step is useful to create a new white balance file during runtime.
When setting the WhiteBalance Coefficient property to Default, the coefficients are predefined based on the sensor's sensitivity to green.
When setting the WhiteBalance Coefficient property to Custom, you are able to set custom red, green and blue coefficients.
The procedure for creating and saving white balance settings with the WhiteBalance step is similar to the portal page:
-
To save the white balance settings, check the Save white balance check box in the Configuration pane and enter a name for the white balance settings file that you will create. This ensures that the new white balance settings will be available the next time you load the project.
-
Grab an image that is a uniform shade of gray. To do so, hold a flat, smooth, non-reflective object that is a uniform shade of gray in front of the camera so that the object occupies the camera's entire field of view. The shade of gray should not be too close to white (too saturated) because if one or more color bands are actually clipped to maximum saturation, the imbalance between the bands cannot be observed.
-
Allow the flowchart to run the WhiteBalance step. In doing so, the step will grab an image.
Results are located in the Quick Access pane and include a pass/fail status as well as corresponding error messages.
The WhiteBalance step uses the same triggering mode as the Camera step. For more information on the triggering mode, see the Triggering section in Chapter 28: Acquisition.
Note that the WhiteBalance step is skipped if you are not connected to a color camera or if you are working from image files.
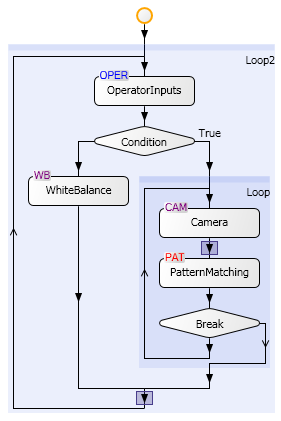
The step is not normally placed in the main loop of the flowchart. The following is a sample flowchart set up to allow the creation of a white balance file during runtime, used in tandem with the creation of a white balance button in the operator view. For information about executing an event-subflowchart, see the Events and actions section in Chapter 2: Building a project.
If the results of the WhiteBalance step are saved, they are available to other projects that run on that runtime platform. A project can use a white balance file that was previously saved on the platform by selecting it in the Cameras page of the Platform Configuration dialog, accessible from the Project Configure platform... menu item.