
Search settings available for all Finder steps
The following subsections provide information on search settings available for all Finder steps (for example, the CircleFinder step, the EllipseFinder step, the ModelFinder step, the RectangleFinder step, and the SegmentFinder step).
 Edge extraction
settings
Edge extraction
settings
Edge extraction settings control the search algorithm and the extraction of edges from your image. To change the default edge extraction settings, perform one or more of the following:
-
Optionally, view all of an image's extracted target edges and resulting model edges. To do so, list all of the step's annotations
 , and
click the
, and
click the  button to the right of the Target edges and
Model edges
items.
button to the right of the Target edges and
Model edges
items.Note that you can also disable Box annotations for increased edge clarity.
-
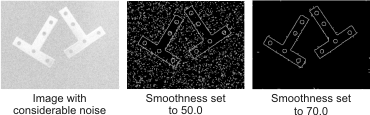
Set the Smoothness. Use this to specify the degree of noise reduction to apply to your images. A setting of 0 indicates almost no noise reduction, while a setting of 100 indicates a very strong noise reduction.
-
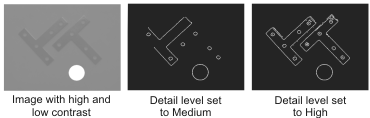
Set the Detail level. Use this to specify which edges to extract from your images. A higher detail level extracts fainter edges than a lower detail level.
-
Set the Search region. Use this to speed up the search and exclude matches outside the specified area. The area must be large enough to contain all possible occurrence reference points, but does not need to contain any entire occurrence. See the Fixturing in an analysis step section in Chapter 32: Fixturing for more information.
General search
settings
General search settings control occurrence attributes and define what is considered a match. To change the default general search settings, perform one or more of the following:
-
Set the Total number of occurrences. Use this to specify the maximum total number of all occurrences to search for in the image. Setting the Total number of occurrences to All can slow down the search; if possible, specify a value.
Note that for the ModelFinder step, which supports multiple models, you can specify the Total number of occurrences of all models and the Number of occurrences of each specific model. Once the specified Total number of occurrences is reached, the search stops regardless of whether the specified number of occurrences set for any individual model was attained.
-
Set the Acceptance. Use this to specify the lowest valid score for a match candidate (that is, a potential occurrence). Setting this value to 100% indicates that you only accept an occurrence if it is a perfect match between the defined model and the match candidate (which is typically hard to obtain).
-
Set the Certainty. Use this to specify the score above which a match candidate (a potential occurrence) is immediately returned as a match (an actual occurrence). If you set the certainty level too high (close to 100.0%), you can slow down the search; if no occurrence is found with a score at or above the certainty level, an exhaustive search for the best occurrences above the acceptance level will be performed. If you set the certainty level too low, false matches can be found. A good certainty level is slightly lower than the expected score, so that the search can finish as soon as a match is found.
-
Set the Polarity. Use this to specify the expected polarity of occurrences, relative to the model for ModelFinder steps, and relative to the foreground color for the other Finder steps. The Polarity can be set to same, reverse, same or reverse, or any.

Note that a model defined from a CAD DXF file has no polarity.
-
Set the Search angle. Use this to specify the nominal angle and angular range at which to search for an occurrence in your image, so as to only accept matches that fall within the specified orientation constraints. Additionally, due to the symmetry of many models, you can search within multiple angular ranges without performing additional searches. This allows you to search for occurrences at the nominal angle and at the angle perpendicular to this angle simultaneously.
-
Set the Search scale and Search aspect inputs. Use these to only accept matches that fall within the specified size and aspect ratio constraints, respectively.
Advanced search
settings
Advanced search settings can be useful for particular applications. To change the default advanced search settings, perform one or more of the following:
-
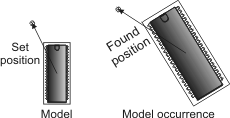
Edit the reference point or angle.
A model occurrence's position result or angle result is the model's reference point or reference angle, respectively, relative to the output image's specified coordinate system. In addition, the search region is the region in which to find the reference point.
Changing a model's position and angle can be useful when you want a well-defined point to be relative to your occurrence (for example, when creating metrology features relative to the model occurrence's position and angle).
For the ModelFinder step, perform the following:
-
In the Configuration pane, click on the model's thumbnail image, and then click on the Edit... button.
-
Enter values for X, Y, and/or Angle. The reference point is relative to the top-left corner of the rectangular region that defines the model.
Alternatively, click on the Place the reference point button and then click on the model image. You can click and drag to interactively relocate the reference point and angle.
For the CircleFinder step, the EllipseFinder step, the RectangleFinder step, and the SegmentFinder step, perform the following:
-
In the Configuration pane, click on the Reference... button.
-
Set the Reference X and Reference Y inputs. Use these to specify the point on the model that represents its location. You can set this point by entering X- and Y-coordinates, which are relative to the model's center (0,0).
-
Set the Reference angle input. The default angle is 0.
-
-
Set the Timeout input. Use this to specify the maximum search time. If a search times out, the number of occurrences found at that point will be returned.
-
Enable or disable the Shared edges input, if applicable. Use this to specify if edges that are part of more than one occurrence are considered part of all respective occurrences. See the Shared edges subsection of the Separation and shared edges section later in this chapter for more information.
-
Set the Fit error weighting factor input. Use this to determine the importance of the fit error when calculating the score and target score. See the Determining what is a match section later in this chapter for more information.
-
Set the Minimum separation angle, Minimum separation X, Minimum separation Y, Minimum separation scale, and Minimum separation aspect ratio inputs. Use these to specify the minimum required amount of separation between occurrences for them to be considered distinct (a match). See the Separation subsection of the Separation and shared edges section later in this chapter for more information.