
Measurement step advanced constraints
This section presents advanced information regarding marker settings in the Measurement step. The level of detail described below, such as changing the weighting or relative importance of an aspect of edge determination, is typically not required for designing the majority of applications.
 Advanced
constraints overview
Advanced
constraints overview
When determining markers in the Measurement step, there can be many candidate markers found within the search region. The best marker within a search region on your image varies with the needs of your application. In order to further refine edge and stripe determination, the Measurement step has advanced constraints that you can use to more precisely specify how edges and stripes should be found within a search region on an image.
Advanced constraints in the Measurement step allow you to give more weight to a candidate marker based on its features, such as the position of a candidate marker within the search box, its contrast, its width, or its spacing compared with other candidates. Advanced constraints can be given a specific scoring weight scale, known as a feature score, that is used to determine the quality of the found markers in relation to a property. The feature score is by default set to 0-100, where edges that best meet the constraint score higher, however advanced constraints do support custom scaled features.
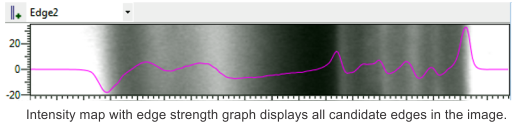
The following images outline some examples of using advanced
constraints in the Measurement step. The first
image features the edge intensity graph of an image, on which many
candidate edges are present. Note that, to generate an intensity
graph within the Measurement step, click the
View edge values ( )
toolbar button in the
Project toolbar.
)
toolbar button in the
Project toolbar.
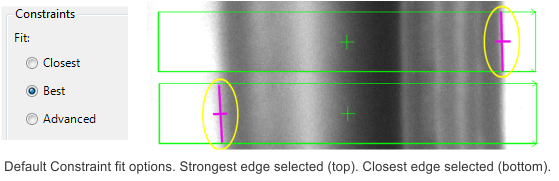
By default, the Measurement step will prioritize the strongest (best) edge in the search region. In the image below, the first scenario selects the strongest edge. You can also select the edge closest to the start of the search box, demonstrated in the second scenario. The image also displays the available constraint options.
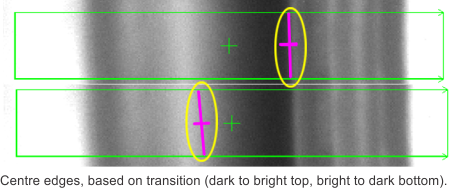
If the strongest or closest edges are not appropriate edges to select, based on the needs of your application, you can use advanced constraints to select another candidate edge in the search region. For example, the following image demonstrates how you can match edges beyond the defaults, in this case positioned closest to the center of the image, and based on the edge transition (dark to bright or bright to dark).
In this case, the 'position' advanced constraint would be set as follows. Markers at the start and end of the search box are unwanted entirely. Markers found in a range expressed around the center of the image are wanted, and that range is specified accordingly. The image below demonstrates how to specify this constraint using the position slider bar, and the provided graph is a visual representation of the thresholding of the position constraint.
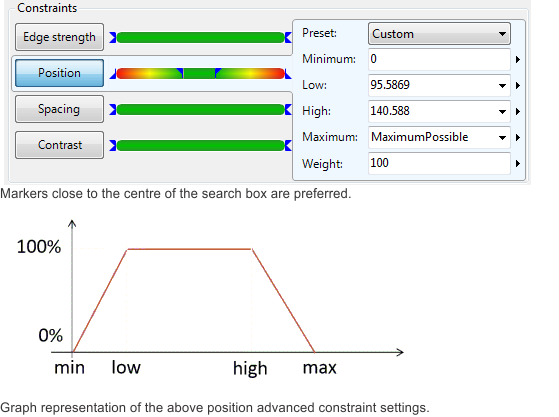
In the graph above, it is clear to see the image has a minimum and maximum position within the search box to find a marker. These conditions are ramped based on the ideal position of the marker within the image, as indicated by the constant, flat section. This indicates markers found at the center of the images are preferred, while markers further from the center of the image are accepted, but score lower and are generally less desirable, and markers at the start or end of the image are not accepted.
The min, low, high and max values can be adjusted, as a group, by selecting from the Preset dropdown list, manually, by typing in the corresponding textbox, or graphically, by using the sliding bar as illustrated.

Available
advanced constraints
Using contrast
Although closely related, edge strength and contrast are separate advanced constraints you can use to select the best edge from a search region based on the needs of your application. Edge strength represents the strength, or value of an intensity transition relative to the number of pixels over which it takes place, whereas contrast represents the actual difference in pixel intensities surrounding an edge.
To better illustrate the best use of contrast as an advanced constraint, consider the following graph, which describes 2 intensity transitions within a search region.
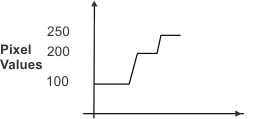
In this graph, 2 edges, or pixel intensity transformations are described. The first transition is a change of 100 in pixel intensities, from 100-200, over a span of 4 pixels. This works out to an edge score of 25. The second transition is a change of 50 pixel intensities, from 200-250, over a span of 2 pixels. This edge is also scored as 25. As both edges have the same score, the contrast advanced constraint is useful for distinguishing the edges. Contrast will differentiate between the pixel intensities surrounding the edges, and determine which edge is appropriate to select. In this case, the first edge has a larger intensity transition, making it a higher contrast edge. Based on this, and the needs of your application, you can select the edge with the lower contrast, or the higher contrast.
Advanced
constraint examples
The following images present some additional examples of setting advanced constraints, along with corresponding graphs and further demonstrates how these work with the Measurement step.
The first image demonstrates a Width advanced constraint preset. In this case, a lower limit is specified for the width of the stripe, where all stripes exceeding that threshold are accepted equally.

The second image demonstrates a Contrast advanced constraint preset. In this case, a minimum threshold is set, and the higher the contrast of a marker, the better it is scored. This is indicated by an upcoming ramp.

The third image demonstrates a Spacing advanced constraint preset. In this case, no minimum threshold is set, however a maximum is set. All markers with spacing below this threshold are accepted equally.
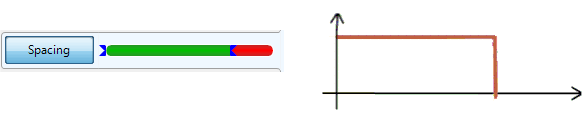
Note that although the advanced constraint sliding bars all work in the same fashion, they do not relate to the image in the same manner. For example, the position advanced constraint slider bar represents locations in the actual search region, whereas the edge strength advanced constraint slider bar represents the strength from minimum to maximum.
You can set more than one advanced constraint in the Measurement step. In the case of multiple set advanced constraints, the weighted scores for each specified advanced constraint on a marker are multiplied to achieve a final score relative to all constraints for each marker. This allows the best marker to be selected based on multiple advanced constraints. Note that, when using multiple advanced constraints, the search can become less robust. Most applications will not need to constrain more than 2 characteristics.