
Procedure for using the CodeGrade step
The CodeGrade step allows you to grade all code types supported by the CodeReader step, except the Pharmacode, Postnet, and Planet code types. The following procedure provides a basic methodology for using the CodeGrade step:
-
Optionally, specify a search region.
-
Optionally, modify the aperture settings.
-
Optionally, specify an extended area reflectance check.
-
Optimize your code setup (calibrate) for grading and specify the grading settings that the CodeGrade step should use to grade your target codes in this environment.
-
Grade your target codes. It is important not to modify the setup for the remainder of the grading process.
 Link the
CodeGrade step to a CodeReader step in the flowchart
Link the
CodeGrade step to a CodeReader step in the flowchart
The CodeGrade step uses a CodeReader step to choose the code type and set up the inputs needed to read occurrences of this code type.
Upon adding a CodeGrade step, a link will automatically be created to the first CodeReader step encountered in the project. Use the dropdown list if you want to select another and then click on the Reinitialize with CodeReader context and ROI button. The CodeGrade step will be reinitialized using the settings found in the specified CodeReader step, including any search region. If you add a CodeGrade step without first adding a CodeReader step, an error will occur.
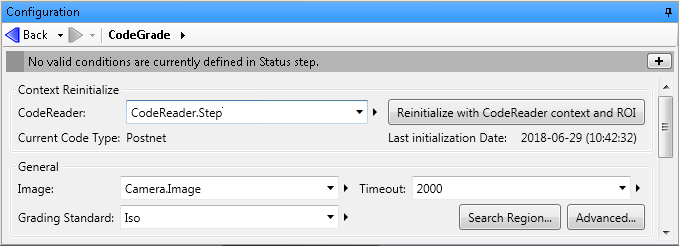
Note that any time you change a setting in the linked CodeReader step, you should click on the Reinitialize with CodeReader context and ROI button in the Configuration pane of the CodeGrade step. At runtime, you need to reconfigure the CodeGrade step.
Typically, you set up a condition that only runs the CodeGrade step if the CodeReader step is successful. You can use the output of the CodeReader step to fixture and place the search region of the CodeGrade step.
Specify a
grading standard
Specify the
search region
By default, the CodeGrade step uses the same search region as the linked CodeReader step.
When specifying the search region, it is important to include the quiet zone of the code. The quiet zone is an area around the code with no markings in it. For 1D codes, the quiet zone immediately precedes the start character and immediately follows the stop character; whereas, for 2D codes, the quiet zone must be present on all 4 sides of the code. The quiet zone must be large enough to meet the code type specifications. For example, the Data Matrix code type requires that the quiet zone be at least 1 cell wide; while 1D code types require a quiet zone of 2 to 10 times the width of the thinnest bar, depending on the type. Additionally, if you specify an extended area reflectance check (discussed later in this section), you must ensure that your search region is large enough to include the extended area.
If you want to specify a search region different from the one
used in the linked CodeReader
step, you can do so by clicking the Search Region... button in
the
Configuration pane of the CodeGrade step, and then
clicking the
Define a region ( ) toolbar button in the
Project toolbar. See the
Search regions section in
Chapter 2: Building a project for more information.
) toolbar button in the
Project toolbar. See the
Search regions section in
Chapter 2: Building a project for more information.
Modify the
aperture settings
There are several settings that you can specify to configure the aperture. The aperture is the diameter of the circular smoothing filter used by the CodeGrade step to avoid minor defects that might influence the grading of a code occurrence. In most cases, the Auto and Default settings are suitable. However, you have several options depending on how you set the Aperture Mode:
-
Relative. This specifies to use a relative aperture size, based on the MinimumCellSize and the Relative Aperture Factor inputs. The latter is determined according to the grading standard you have specified. This is the Default setting. If you want to specify a value in real-world units, you can enter a value in the Pixel Size in mm input. This will convert the value you have entered in Relative Aperture Size to real-world units using the scale you have provided. Note that, specifying the aperture factor with a pixel size in millimeters is typically used when configuring your aperture to be calculated according to the exact guideline from the ISO industry-standardized print-quality specification.
Data to use
Relative Aperture Factor
Pixel Size in mm
Calculation used
Use standardized factors without specifying pixel size.
Auto
Unknown
aperture factor x MinimumCellSize, where aperture factor is a range from 0.15 to 0.8, depending on the code type and applicable standard.
Use standardized factors and specify the pixel size.
Auto
Pixel size in mm
For EAN/UPC code types, 0.15 / Pixel Size in mm .
For all other codes, Reference number / Pixel Size in mm , where Reference number is a range from 0.075 to 0.5, and is based on the cell size in millimeters (MinimumCellSize x Pixel Size in mm) and the ISO/IEC 15416 specification.
Note that, if the cell size in millimeters is less than 0.1 millimeters, the following formula is used: 0.5 x MinimumCellSize for 1D codes, and the aperture size is 0.8 x MinimumCellSize for matrix codes.
Use the specified aperture factor and the pixel size.
Aperture factor
Pixel size in mm
Relative Aperture Factor x MinimumCellSize. Note that the cell size should be the smallest cell size among all of the code occurrences in your images.
-
Absolute. This allows you to set the diameter of the aperture to a fixed value so that it will not change regardless of the cell size of your code occurrence. If the image is calibrated, you specify the size in real-world units; otherwise, specify the absolute aperture size in pixels.
-
The Disable aperture setting. This specifies to disable the aperture. In this case, the results returned by the CodeGrade step will more closely resemble the results of the CodeReader step.
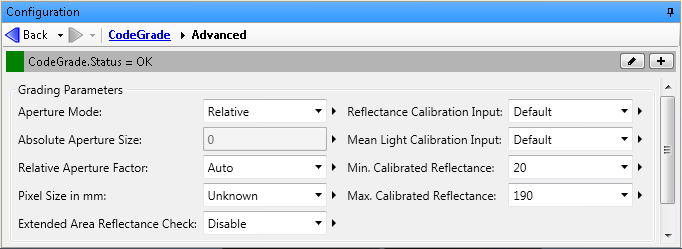
Note that the Grading Parameters section only applies to 1D code types, PDF417, and composite codes; it does not apply to Data Matrix codes.