Configuring actions and events
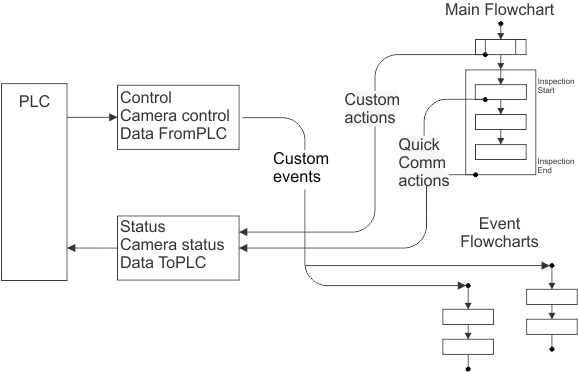
Matrox Design Assistant's Quick Comm feature provides a handshake protocol between the runtime platform and the PLC. Reaching certain points in the flowchart trigger actions, which make up the handshake protocol, as outlined in the Status and control handshake subsection of the Procedure for communicating with controllers section earlier in this chapter. With Quick Comm, the data fields that are associated with the handshake actions are predefined. However, Matrox Design Assistant also allows you to create custom actions and events and associate them with data fields.
 Subflowchart
execution events
Subflowchart
execution events
Matrox Design Assistant also allows you to define events that trigger the execution of a given flowchart upon a change in value of a certain data field.
The following steps provide a basic methodology for configuring a custom subflowchart event that is based on a data field:
-
Open the Platform Configuration dialog, and then navigate to the Profinet or EthernetIP page under the Industrial Protocols page, depending on which industrial protocol you are using.
-
Click on the plus button in the top-right corner of the appropriate module. Each module contains a set of data fields. The Status and Control modules, as well as each Camera module, contain the data fields that are predefined by Quick Comm. The DataFromPLC and DataToPLC modules contain custom data fields to be written by or read from the PLC.
-
Select the data field to associate with the event, and click on Add Event, which will open a dialog.
-
Specify the value to which the specified data field must change to execute the subflowchart. You can set the subflowchart to execute when the field changes to any value, or to a specific value. You must also select the flowchart to execute upon the change in value. You can either select a flowchart from the list, or create a new flowchart by clicking on the plus button.
-
Once you have created an event, you can delete it or modify it. You can modify the data field value that triggers the flowchart execution, as well as the flowchart to be executed.
Note that you cannot change the field associated with an event. To do this, you must first delete the event, and create a new one. Also, a given data field cannot be associated with more than one subflowchart execution event.