
Morphology operations
 Previous
- Next

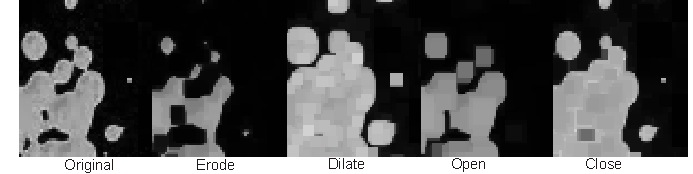
Morphology operations shrink or grow groups of pixels. Pixels are added or removed depending on the selected operation, the pixel values and the values in the structuring element. The operations are defined with respect to white objects, Erode will make a white object smaller, Dilate will make a white object larger, Close with 4 iterations will join together any white objects that are less than 8 pixels apart.
If your objects are dark on a bright background use their "dual" function - Erode instead of Dilate, Close instead of Open.
-
Set or link the SourceImage property.
-
Set the Number of Iterations. For an area opening or closing operation, this property specifies the minimum area, in pixels. For the other morphological transformations, this property specifies the number of times to iterate the operation.
-
Set the Processing Mode to Grayscale or Binary. In Binary mode, non-zero pixels will be treated as ones (1) during processing. In Grayscale mode, the source image's gray values are used for processing and the resulting image will also contain gray values.
The default structuring element is a 3x3 rectangle. Morphology operations Erode, Dilate, Open, Close, TopHat, and BottomHat allow you to set the X and Y sizes of the structuring element. Larger elements have a stronger effect and NX1 or 1XN elements bias the operation in the horizontal or vertical direction.
If you need to specify a custom structuring element, for example, containing DontCare entries, you can select the UserMorph operation and import a custom structuring element created with the Matrox Imaging Library or with Matrox Inspector.
 Examples
Erode and Dilate operations shave off and add pixels around objects, respectively. Open performs an Erode then a Dilate, which eliminates small objects while maintaining the rough size of larger objects. Close performs a Dilate then an Erode, which fills in holes in larger objects. The following set of images demonstrate these operations iterated 3 times.
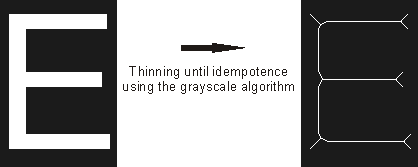
Thick and Thin operations add and peel layers from an object, respectively. These operations are similar to the dilate/erode operations except, if continuously iterated, they will not convert all pixels into object pixels (as is the case of a dilation) or into background pixels (as is the case of an erosion). Instead, they will eventually reach a steady state (known as idempotence). In the case of a thin operation, this state is reached when objects are reduced to their skeleton.
AreaOpen and AreaClose operations flatten bright peaks and raise dark hollows, respectively. They replace regions whose areas are smaller than the specified area parameter with the adjacent gray value. Objects smaller than the specified area will be removed while objects larger than the specified area will have their intensity reduced. It can also be useful in removing reflective highlights. The following image shows the original and AreaOpen for areas of 200 and 300. The image has been pseudo-colored to make the intensity variations more visible.

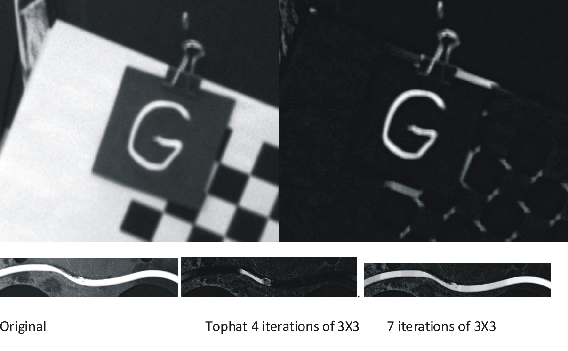
TopHat and BottomHat can be used to keep only small bright or dark objects, respectively, whose size is specified by the size of the structuring element and the number of iterations. It can be useful in making letters and numbers stand out from their background before using the StringReader step or SureDotOCR step. It can be used to highlight a portion of an object that is narrower or wider than expected.
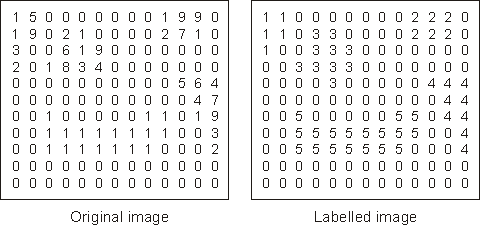
Label identifies area blobs, which are connected areas of non-zero pixels on a background of zero pixels. Starting from the top-left corner of the source image, the label operation finds these area blobs, and changes their pixel value; the first area blob's pixels will all have the value 1, the second area blob's pixels will all have the value 2, and so on. You can define the LabelProcessingMode property, either FourConnected or EightConnected, when labeling.
The label operation applied to the output image of the BlobAnalysis step lets you label only included blobs or only excluded blobs. The label option in the BlobAnalysis step labels all blobs regardless of their Filter status.
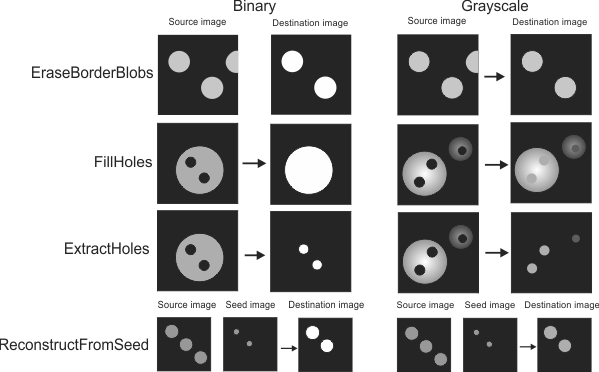
Reconstruct allows you to perform several operations on blobs. It is often useful to remove extraneous blobs or blob holes from an image prior to using a BlobAnalysis step. One of the operations that allows you to preprocess images is the reconstruct operation. The image below shows the 4 options for the ReconstructOperation property.
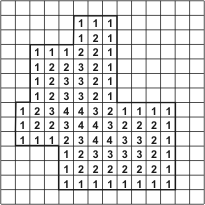
Distance determines the minimum distance from each foreground (non-zero) pixel to a background (zero) pixel, and assigns this distance to the foreground pixel. It produces a type of contour mapping of an image's foreground (object) pixels. You can set the Distance mode to CityBlock, Chessboard, or Chamfer_3_4. The following table demonstrates how each mode performs the Distance operation:
|
Distance modes |
||

|
|

|
|
City Block transform |
Chessboard transform |
Chamfer 3-4 transform |
Of the distance modes, Cityblock and Chessboard are the fastest; while Chamfer_3_4 will give you the best results. Note that when using Chamfer_3_4 in an 8-bit output image, you will be limited to a maximum distance of 85. If your operations are limited by this value, you should consider using a 16-bit output.
ZoneOfInfluence separates an image into zones, according to how much of an area's surrounding background is within that areas territorial boundaries. For optimal results, background pixels should be equal to 0. Using the ZoneOfInfluence operation on a BlobAnalysis step output image will ensure that the image has been binarized. Note that you might have to change the View mode to Autoscale to visualize the results of the ZoneOfInfluence operation since the zones might be too dark to see.