Copyright© 2007-2019 by Matrox Electronic Systems Ltd. All rights reserved.
Contents
Photoneo PhoXi with Matrox Design Assistant
Installing the Phoxi Control app
Creating the Design Assistant Project
To launch and minimize the Phoxi Control app automatically at boot, without the 3D viewer
Photoneo PhoXi with Matrox Design Assistant
This document will guide you through setting up to capture depth map images from your Photoneo Phoxi into Matrox Design Assistant.
Design Assistant software triggers are supported, so the PhoXi can be triggered from the PLC using QuickComm, or via a button in the interface, or a Trigger flowchart step.
Installing the Phoxi Control app
· The PhoXi Control app must be installed and running on the target runtime platform. Design Assistant currently supports v1.1.62 which can be found at https://www.photoneo.com/3d-scanning-software/
· Note that the Control App v1.1.62 is compatible with device firmware versions v1.1.62 and v1.1.41
· In PhoXi Control setup, both API and Driver components must be installed
· The PC must be rebooted after the installation of the PhoXi Control app
Running the Phoxi Control app
·
The PhoXi Control app starts
automatically when Windows starts. There is no setting in the app
itself to enable/disable startup. Its shortcut can be found in the
system tray:
![]()
· Control app can only be run as an administrator.
· Before creating a project in Design Assistant, tune the Photoneo PhoXi's settings in the PhoXi Control app.
o In the Network Discovery page, take note of the serial number/ID or the IP address of the device, you will need them in the Design Assistant project
o Set up your camera respecting the scanning zones described in the datasheet for your PhoXi model.
o Verify that the output images are as expected (and the confidence map is white for the objects you are interested in)
o You may find the hints in the following article useful: http://wiki.photoneo.com/index.php/Scanning_best_practices
Creating the Design Assistant Project
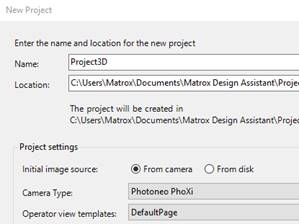
Open Design Assistant. Create a new project, and specify the Photoneo PhoXi camera type.
Connecting to the PhoXi
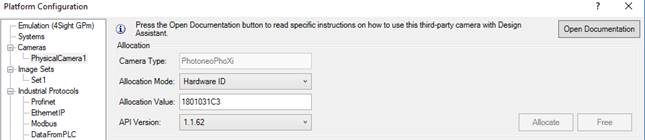
Open the Platform Configuration dialog for PhysicalCamera1. Choose an allocation mode, enter the appropriate value for that mode and click Allocate. If you choose the Hardware ID and IP Address mode, you must separate the two values with a semicolon, for example 1801031C3;169.254.9.165.
Configuring the Camera step
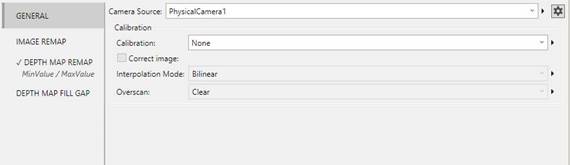
In the Camera step, verify that the Camera Source input is PhysicalCamera1.
Rerun the Camera step and click on the Send Trigger button in the Wait notification bar.
Setting Remap parameters
If your depth map image shows a range of colors from red to blue over your objects of interest, then the default mapping is suitable for your scan.
Unfortunately, in the presence of shiny objects and vertical faces some of the reflections of the scanner’s light go astray, and the PhoXi may interpret them to have the wrong depth.
For example here are several objects on the floor, about a meter away, with the ideal display:
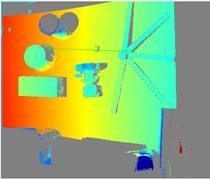
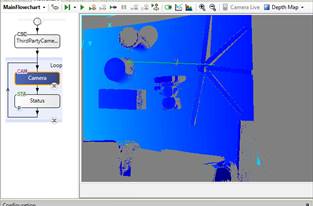
However, the original grabbed depth map showed mostly a small range of colors:
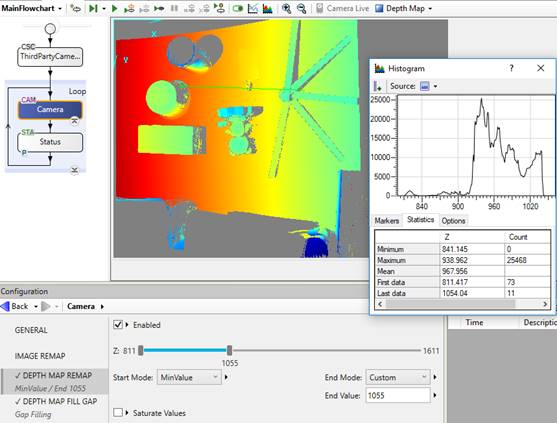
Looking at the histogram, as expected, most of the data points lie just above the floor – but there are spurious artifacts that report with depth more than 1.6 meters. These reflection artifacts mean that the default mapping from min to max data value is not focusing on where the objects are. You can select a Z-range from the total depth so that the spurious data is excluded. To do so, adjust the right-hand slider (in the DEPTH MAP REMAP tab) down, in this example around 1050. Alternatively, choose a Start/End Mode specifying 3 standard deviations either side of the mean.

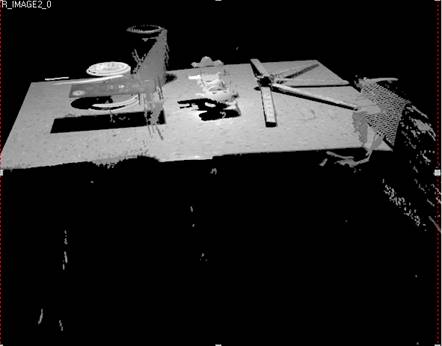
Additional details: In this example, if we examine the scene in the PhoXi control app we see the spurious pixel values “below” the floor.
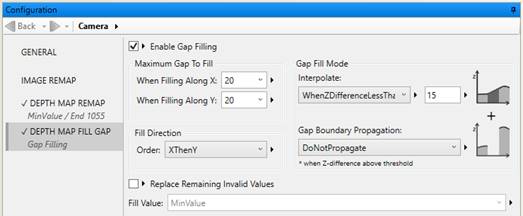
Setting Fill Gap parameters
Invalid pixels appear gray in Design Assistant depth maps when using a colormap. They appear black in the PhoXi Control app.
In Design Assistant, you can replace some of the invalid pixel values with depths interpolated from neighboring pixels.
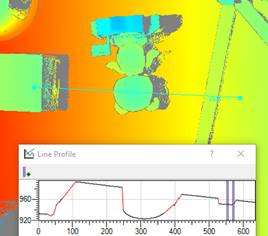
The Line profile shows the invalid pixel locations in red. You can use the vertical markers on the graph to measure the width of the gaps and evaluate the Z difference.
|
Gap filling disabled |
Gap filling enabled |
|
|
|
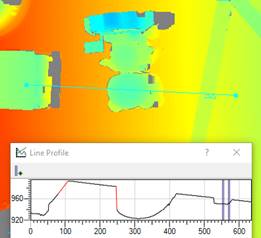
In this example, limiting the width of gaps to fill to 20 pixels and the Z difference to 15 we see the edges around the ruler have been replaced, but the large shadows have not.
Using QuickComm
The trigger can be provided by the PLC directly using the Quick Comm PLCCamera1Trigger bit if you set the trigger target in the Platform Configuration page for EtherNet/IP or PROFINET.

Limitations
· In the current version of the API/PhoXi Control app, the Control app shuts down when it is minimized and the camera logs out (log out happens when the Ethernet/power cable gets disconnected or doing a disconnect and log out from the API). This bug is absent in the next version's RC so we do not expect this in future release versions.
·
By default, the PhoXi Control
app renders a 3D view that requires the GL_EXT_gpu_shader4 graphics
capability. Systems which do not provide this OpenGL capability
will show an error when the Control app connects to the PhoXi.
Photoneo provides a batch file that starts the Control app without
the 3D view. It is located in the installation folder under
bin\support\PhoXi_Control_No3DGUI.bat. More details
below.
To launch and minimize the Phoxi Control app
automatically at boot, without the 3D viewer:
- Open the startup programs directory, which is located at %APPDATA%\Microsoft\Windows\Start Menu\Programs\Startup
- Delete PhoXi Control.
- In a different window, open the PhoXi Control support directory, which is located at %PHOXI_CONTROL_PATH%\bin\support
- Drag PhoXi_Control_No3DGUI.bat with the right mouse button and drop it in the startup programs directory.
- A context menu appears. Select Copy here.
- In the startup programs directory, right-click on PhoXi_Control_No3DGUI.bat, then select Edit. This opens Notepad.
- Add
the minimized option at the end of the last command line. It should
look like this:
start "%PHOXI_CONTROL_PATH%\bin" PhoXiControl.exe –minimized
- Save and close Notepad.